
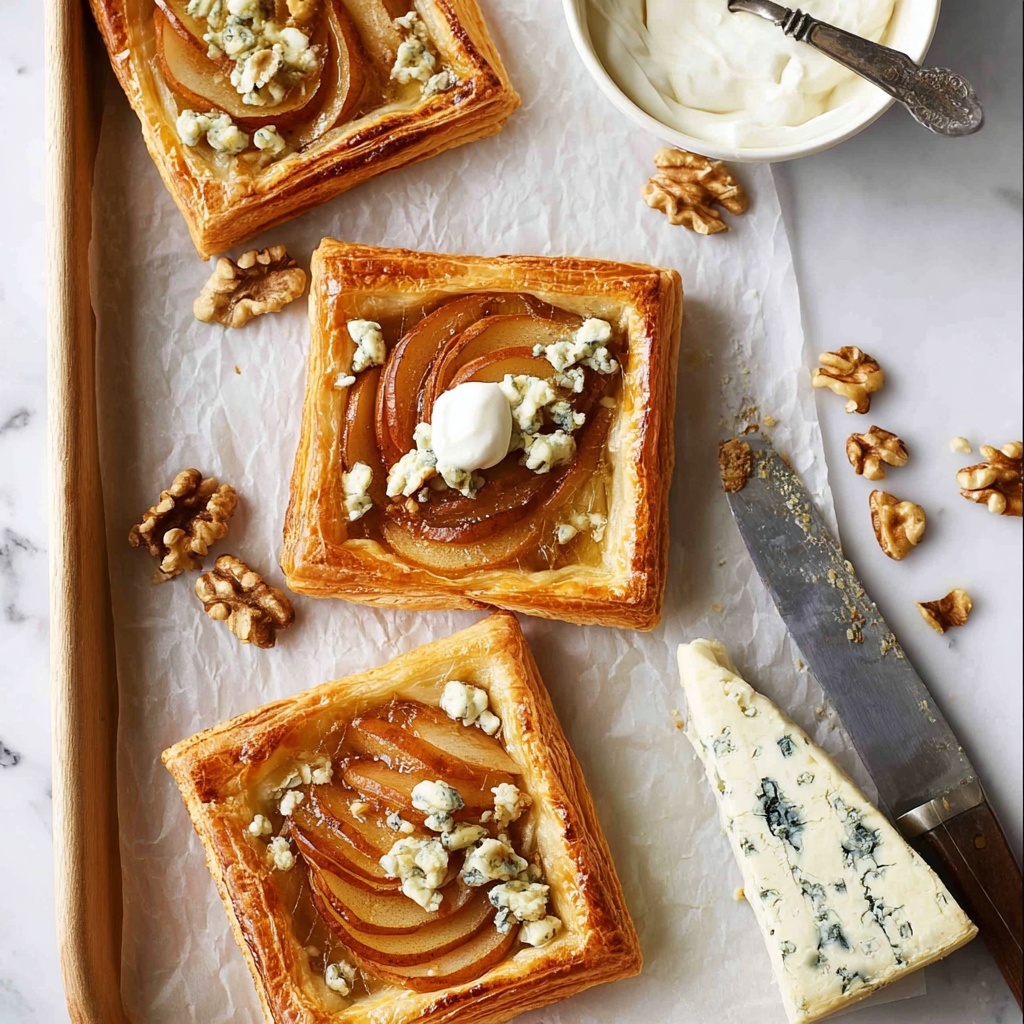
If you adore the beautiful harmony of sweet and savory flavors, you are going to fall head over heels for this Caramelized Pears and Blue Cheese Tarts Recipe. Picture tender, caramel-rich pears nestled on flaky puff pastry, crowned with tangy blue cheese and crunchy walnuts, creating a bite that’s both elegant and utterly comforting. It’s a dessert that feels fancy but is surprisingly easy to make, perfect for impressing guests or indulging yourself on a cozy night in.
Ingredients You’ll Need
Don’t let the simplicity of these ingredients fool you — each one plays a crucial role in bringing this tart to life, delivering layers of texture and flavor that work in perfect sync.
- Store bought puff pastry (1 sheet, thawed): Provides a buttery, flaky base that’s effortlessly impressive.
- Pear (2, ripe but firm): The star fruit, offering natural sweetness and juiciness that caramelizes beautifully.
- Unsalted butter (2 tbsp): Adds richness to the caramelization process, helping the pears soften and brown evenly.
- Brown sugar (1/3 cup, lightly packed): Creates that luscious caramel syrup that coats the pears with a deep sweetness.
- Pinch of salt: Balances sweetness and enhances all the flavors.
- Egg (1, lightly beaten): Used for egg wash to give the puff pastry that irresistible golden finish.
- Crumbled blue cheese (1/3 to 1/2 cup): Brings a tangy, creamy contrast that makes each bite unforgettable.
- Walnuts (3 tbsp, roughly chopped): Add a lovely crunch and toasty note that complements both the pears and cheese perfectly.
How to Make Caramelized Pears and Blue Cheese Tarts Recipe
Step 1: Prepare Your Oven and Pastry
Start by preheating your oven to 180C/350F and lining a baking tray with parchment or baking paper. This ensures your tarts will cook evenly and not stick, making the process smooth right from the start.
Step 2: Cut the Puff Pastry
Take your thawed puff pastry sheet and slice it into four equal squares. This portioning is important for even baking and gives you perfectly sized tarts that are easy to enjoy in one or two bites.
Step 3: Score the Pastry Border
Using a knife, gently score a 2/3 inch (about 1.5 cm) border around each square without cutting all the way through. This little edge will puff up during baking, creating a lovely raised crust to hold the flavorful filling beautifully.
Step 4: Slice the Pears
Core the pears and slice each quarter into three or four pieces. Keeping the slices relatively even ensures they cook uniformly, soaking up that buttery brown sugar glaze perfectly.
Step 5: Caramelize the Pears
In a small frying pan or saucepan over medium-high heat, melt the butter, add brown sugar, salt, and then toss in the pear slices. Cook for about 5 minutes, stirring occasionally until the pears soften and the juices combine with the butter and sugar into a rich, amber syrup. This caramelized pear mixture is what gives these tarts their signature flavor and luscious texture.
Step 6: Prepare the Pastry Base
Set your caramelized pears aside to cool for about 5 minutes. Meanwhile, brush the scored borders of your pastry squares with the beaten egg. This step will help the edges turn a gorgeous golden brown while baking.
Step 7: Assemble the Tarts
Carefully spoon the pear mixture onto each pastry square, making sure to stay within the scored borders. Drizzle some of the caramel syrup over the pears for extra glossy sweetness.
Step 8: Bake the Tarts and Toast Walnuts
Pop the tarts into the oven and bake for 20 to 25 minutes, until the pastry is deep golden and puffed. During the last 5 minutes, scatter the chopped walnuts onto the baking tray to toast lightly, adding a warm crunchy texture to the final dish.
Step 9: Cool and Add Final Touches
Remove the tarts from the oven and let them rest for 5 minutes. This brief cooling helps set the caramel and makes the tarts easier to handle.
Step 10: Top with Blue Cheese and Walnuts
Sprinkle crumbled blue cheese over the warm tarts, scatter the toasted walnuts on top, and drizzle any remaining syrup over everything. Serve immediately for the best flavor experience, and if you like, add a dollop of plain yogurt on the side for a silky contrast.
How to Serve Caramelized Pears and Blue Cheese Tarts Recipe

Garnishes
Fresh herbs like thyme or rosemary make a fabulous garnish, adding an earthy aroma that pairs beautifully with the sharpness of the blue cheese and the sweetness of the pears. A light drizzle of honey can also enhance the natural flavors if you want an extra touch of sweetness.
Side Dishes
A simple mixed green salad dressed with a tangy vinaigrette balances the richness of these tarts. You could also serve them alongside a glass of crisp white wine or sparkling water infused with citrus slices for a refreshing complement.
Creative Ways to Present
For a dinner party, serve each tart on small wooden boards or pretty plates with some decorative edible flowers or microgreens sprinkled on top. You can cut the tarts into smaller squares for a more casual appetizer style at gatherings, letting everyone enjoy a bite-sized taste of this delightful recipe.
Make Ahead and Storage
Storing Leftovers
If you happen to have any leftovers, place the tarts in an airtight container and keep them in the refrigerator. They will stay fresh for up to 2 days and the flavors often deepen even more after resting.
Freezing
These tarts are best enjoyed fresh, but you can freeze the puff pastry before baking if you want to prep in advance. Freeze the baked tarts cautiously in a sealed container with parchment paper between each layer for up to one month. Thaw in the fridge before reheating.
Reheating
To bring back that flaky crispiness and warm caramel goodness, reheat the tarts in a preheated oven at 160C/320F for about 8-10 minutes. Avoid the microwave as it tends to soften puff pastry and diminish the crunchy texture.
FAQs
Can I use another type of cheese instead of blue cheese?
While blue cheese gives a wonderful tang and creaminess, you can experiment with goat cheese or feta for a milder, crumbly alternative that still pairs nicely with caramelized pears.
What kind of pears work best in this recipe?
Firm but ripe pears like Bosc or Anjou are ideal because they hold their shape during cooking but become tender and juicy when caramelized.
Is it necessary to score the pastry border?
Scoring the border helps the edges puff up beautifully and keeps the filling neatly contained. Skipping this step can lead to a less structured tart with filling that may spread out.
Can these tarts be made vegan?
With a few substitutions like vegan puff pastry, plant-based butter, and a dairy-free cheese alternative, you can definitely adapt this recipe for a vegan diet, though the signature flavor will differ.
What’s the best way to slice the pears?
Slicing pears into even, thin pieces helps them cook evenly and caramelize faster, giving you that soft yet slightly textured bite that makes this tart so special.
Final Thoughts
There is something truly magical about the blend of caramelized pears and tangy blue cheese on a golden, flaky tart. I hope you enjoy making and sharing this Caramelized Pears and Blue Cheese Tarts Recipe as much as I do. It’s one of those irresistible dishes that feels like a little celebration with every bite, sure to become a favorite in your recipe rotation.
Print
Caramelized Pears and Blue Cheese Tarts Recipe
- Prep Time: 10 minutes
- Cook Time: 30 minutes
- Total Time: 40 minutes
- Yield: 4 tarts
- Category: Appetizer
- Method: Baking
- Cuisine: Western
Description
Delight in these elegant Caramelized Pears and Blue Cheese Tarts, featuring flaky puff pastry topped with sweet, buttery caramelized pears, rich gorgonzola blue cheese, and crunchy toasted walnuts. Perfect as a sophisticated appetizer or a unique dessert, these tarts combine savory and sweet flavors harmoniously in a quick and easy-to-make recipe.
Ingredients
Pastry
- 1 sheet store bought frozen puff pastry, thawed (25 cm x 25 cm / 10″ x 10″)
Caramelized Pears
- 2 pears
- 2 tbsp unsalted butter
- 1/3 cup brown sugar, lightly packed
- Pinch of salt
Other
- 1 egg, lightly beaten
- 1/3 to 1/2 cup crumbled blue cheese (I used gorgonzola)
- 3 tbsp walnuts, roughly chopped
Instructions
- Preheat oven and prepare baking tray: Preheat your oven to 180°C (350°F) and line a baking tray with parchment or baking paper for easy cleanup and to prevent sticking.
- Cut puff pastry: Cut the thawed puff pastry sheet into 4 equal squares and transfer them onto the prepared baking tray, spacing them slightly apart.
- Score pastry borders: Using a knife, score a 2/3 inch (1.5 cm) border around each pastry square, being careful not to cut all the way through. This helps the edges puff up during baking.
- Prepare pears: Cut each pear into quarters, remove the core, then slice each quarter into 3 or 4 thin slices to ensure even cooking and caramelization.
- Caramelize pears: In a small frying pan or saucepan over medium-high heat, combine the pear slices, unsalted butter, brown sugar, and a pinch of salt. Cook for about 5 minutes, stirring occasionally, until pears soften and the juices combine with butter and sugar to form a sticky syrup.
- Cool pear mixture and egg wash pastry: Remove the pan from heat and let the pear mixture cool for 5 minutes. While cooling, brush the scored border of each pastry square with the lightly beaten egg to create a golden crust.
- Assemble tarts: Spoon the caramelized pear mixture onto each pastry square within the scored borders, making sure not to overflow. Drizzle some of the caramel syrup over the pears for extra flavor.
- Bake tarts and toast walnuts: Bake the tarts in the preheated oven for 20 to 25 minutes, until the pastry is deep golden brown. For the last 5 minutes of baking, scatter the chopped walnuts on the baking tray to toast gently.
- Cool baked tarts: Remove the tarts from the oven and allow them to cool for about 5 minutes to let the filling set slightly.
- Finish and serve: Top each tart with crumbled blue cheese and the toasted walnuts. Drizzle remaining syrup over the top and serve immediately. Optionally, serve with a side of yogurt to balance the flavors.
Notes
- Note 1: Use a sharp knife to cut the puff pastry for clean edges and even-sized tarts.
- Note 2: Scoring the pastry border without cutting through allows the edges to puff up nicely and hold the filling.
- Note 3: Brushing the egg wash on the border helps to achieve a golden, glossy crust when baked.

