
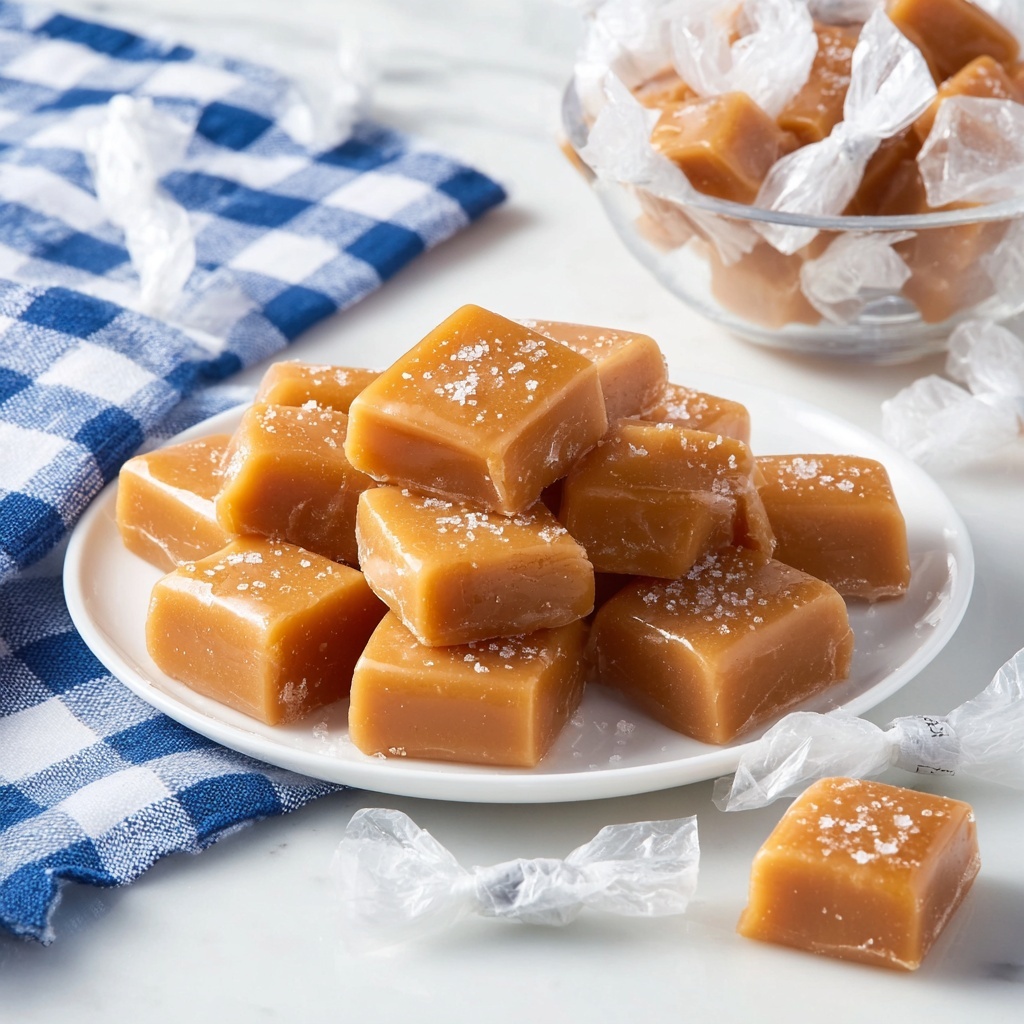
There is something truly magical about a rich, buttery candy that melts in your mouth with just the right balance of sweet and salty notes. This Homemade Caramels Recipe brings that magic straight to your kitchen, letting you craft irresistibly chewy caramels with simple ingredients and approachable steps. Whether you are treating yourself or making gifts for loved ones, these caramels deliver that nostalgic comfort and luxurious flavor that store-bought versions just cannot compete with.
Ingredients You’ll Need
Creating the perfect batch of caramels requires ingredients that are humble yet each plays a crucial role in building the texture, flavor, and beautiful golden color. Here’s what you’ll want to gather:
- Unsalted butter: 1/2 cup adds richness and a creamy mouthfeel without overpowering saltiness.
- Granulated sugar: 1 cup provides essential sweetness and helps achieve that perfect caramel structure.
- Brown sugar: 1 cup brings deeper, molasses-like flavor notes and tender chewiness.
- Light corn syrup: 1 cup prevents crystallization and keeps the caramel smooth and pliable.
- Evaporated milk: 12 ounces introduces creaminess and a slight tang that balances the sugars.
- Kosher salt: 1 teaspoon enhances all the flavors and provides a subtle contrast to the sweetness.
- Vanilla extract: 1/2 teaspoon adds a warm, mellow essence that lifts the caramel to another level.
How to Make Homemade Caramels Recipe
Step 1: Prepare Your Pan
Start off by lining an 8×8-inch pan with parchment paper, letting it hang over the edges a bit to make it easier to lift the caramel out later. This simple prep step ensures your caramels will come out perfectly shaped without sticking to the pan.
Step 2: Combine and Boil the Sugars
In a medium saucepan over medium heat, place your butter, granulated sugar, brown sugar, corn syrup, and salt. Stir frequently until the mixture begins to boil—this should take about 8 minutes. Watching closely during this stage is key for achieving the perfect caramel consistency.
Step 3: Slowly Add Evaporated Milk and Reach the Soft Ball Stage
Once boiling, gradually add the evaporated milk bit by bit while continuously stirring. This slow addition — sustained for 10 to 15 minutes — allows the mixture to reach the ideal “soft ball” stage, which is about 238 degrees Fahrenheit on a candy thermometer. If you don’t have one, test by dropping a bit of the caramel into ice water: if it forms a pliable ball you can mold with your fingers, you’ve nailed it. Remove from heat and stir in the vanilla extract carefully.
Step 4: Cool Completely to Set
Pour the luscious caramel mixture into your prepared pan and smooth it out gently. Place the pan in the refrigerator for at least 30 minutes so the caramel sets firm enough to cut. Cooling is essential not only for texture but also to make handling much easier.
Step 5: Cut Into Perfect Squares
Lift the caramel block out of the pan using the parchment paper edges, then with a sharp knife, slice the caramel into bite-sized squares. This step is so satisfying — seeing your masterpiece come together!
Step 6: Wrap and Store
For gifting or keeping fresh longer, wrap each caramel square in wax paper, twisting the ends to secure. This little packaging trick also makes them look super charming, perfect for sharing.
How to Serve Homemade Caramels Recipe

Garnishes
Elevate your caramels by sprinkling a tiny pinch of flaky sea salt on top before they set for an irresistible sweet-salty finish. You could also lightly dust with cocoa powder or finely chopped nuts for added texture and flavor contrast.
Side Dishes
While caramels are delightful on their own, they pair wonderfully with a cup of rich coffee or a creamy latte. If you’re feeling creative, serve alongside vanilla ice cream or fresh fruit for a delightful dessert platter.
Creative Ways to Present
Wrap your homemade caramels in colorful wax paper tied with twine for festive gift-giving. Another idea is arranging squares artistically on decorative trays lined with doilies for parties or events. Presentation truly makes this Homemade Caramels Recipe shine beyond just taste.
Make Ahead and Storage
Storing Leftovers
Store leftover caramels in an airtight container at room temperature or in the fridge for up to two weeks. Proper sealing keeps them chewy and prevents them from absorbing any unwanted fridge odors.
Freezing
You can freeze wrapped caramels in a zip-top bag or airtight container for up to three months. Thaw at room temperature before serving to preserve that inviting chewiness.
Reheating
If your caramels harden too much, warming them slightly between your hands or briefly in the microwave on low power softens them up beautifully without melting completely.
FAQs
What is the “soft ball” stage and why is it important?
The soft ball stage is when heated sugar syrup reaches approximately 238°F (114°C). At this point, when a small amount is dropped into cold water, it forms a soft, pliable ball. This stage is critical for caramels to ensure they set to a perfect chewy texture rather than hard candy.
Can I use heavy cream instead of evaporated milk?
While heavy cream is richer, evaporated milk provides a slightly tangy flavor and a balance that helps the caramels set correctly. Using cream could affect the final texture, making it softer and more prone to melting.
How do I prevent the caramel from becoming grainy?
Constant stirring and using corn syrup are key to preventing crystallization, which causes graininess. The corn syrup interrupts sugar formation, ensuring smooth, velvety caramels every time.
Can I make these caramels vegan?
Traditional recipes rely on dairy like butter and evaporated milk. For a vegan version, you’d need to substitute with plant-based butter and coconut milk or almond milk and carefully test the cooking stages, but results may vary in texture and flavor.
How long will these homemade caramels last?
Stored properly at room temperature in a sealed container, these caramels can last up to two weeks. Refrigeration can extend that time a bit, but always check their texture before enjoying.
Final Thoughts
There is such joy in crafting this Homemade Caramels Recipe from scratch — the delightful aroma filling your kitchen, the satisfying boil and stir, and finally biting into the rich, chewy candy that you made with your own hands. It’s a timeless treat that brings smiles and warmth, whether for yourself or a thoughtful gift. Give it a try and soon you’ll wonder how you ever settled for anything less than homemade!
Print
Homemade Caramels Recipe
- Prep Time: 10 minutes
- Cook Time: 25 minutes
- Total Time: 35 minutes
- Yield: Approximately 100 pieces
- Category: Candy
- Method: Stovetop
- Cuisine: American
Description
Delight in these rich and buttery homemade caramels, perfectly chewy and infused with a hint of vanilla. Crafted with simple ingredients like butter, sugars, and evaporated milk, this recipe guides you through creating the perfect soft ball stage caramel for irresistibly smooth and flavorful treats, ideal for gifts or snacking.
Ingredients
Caramel Base
- 1/2 cup unsalted butter
- 1 cup granulated sugar
- 1 cup brown sugar
- 1 cup light corn syrup
- 12 ounces evaporated milk
- 1 teaspoon kosher salt
- 1/2 teaspoon vanilla extract
Instructions
- Prepare Pan: Line an 8×8-inch pan with parchment paper, letting the edges hang over slightly to make removal easier later.
- Combine Ingredients: In a medium saucepan over medium heat, add the butter, granulated sugar, brown sugar, corn syrup, and kosher salt. Stir continuously until the mixture begins to boil, approximately 8 minutes.
- Add Evaporated Milk Slowly: Gradually add the evaporated milk in small increments, continuing to stir as the mixture boils. Keep stirring for 10-15 minutes until the caramel reaches the soft ball stage (238°F) on a candy thermometer. Test by dropping a small amount in ice water – if it forms a pliable ball that can be molded with fingers, it’s ready. Remove from heat and stir in the vanilla extract carefully.
- Set the Caramel: Pour the hot caramel mixture into the prepared pan. Allow it to cool completely by refrigerating for at least 30 minutes until firm.
- Cut into Squares: Once set, lift the caramel out with the parchment paper and use a sharp knife to cut into 1-inch squares or desired sizes.
- Wrap for Storage or Gifts: For gifting, wrap each caramel individually in wax paper by placing a caramel piece in the center, rolling it up, and twisting the ends to seal.
Notes
- The soft ball stage is key for perfect texture; use a candy thermometer for accuracy.
- Wrapping caramels individually helps prevent sticking and keeps them fresh longer.
- Store caramels in an airtight container in the refrigerator for up to 2 weeks.
- Let caramels come to room temperature before serving for optimal chewiness.
- Use high-quality vanilla extract for the best flavor profile.

