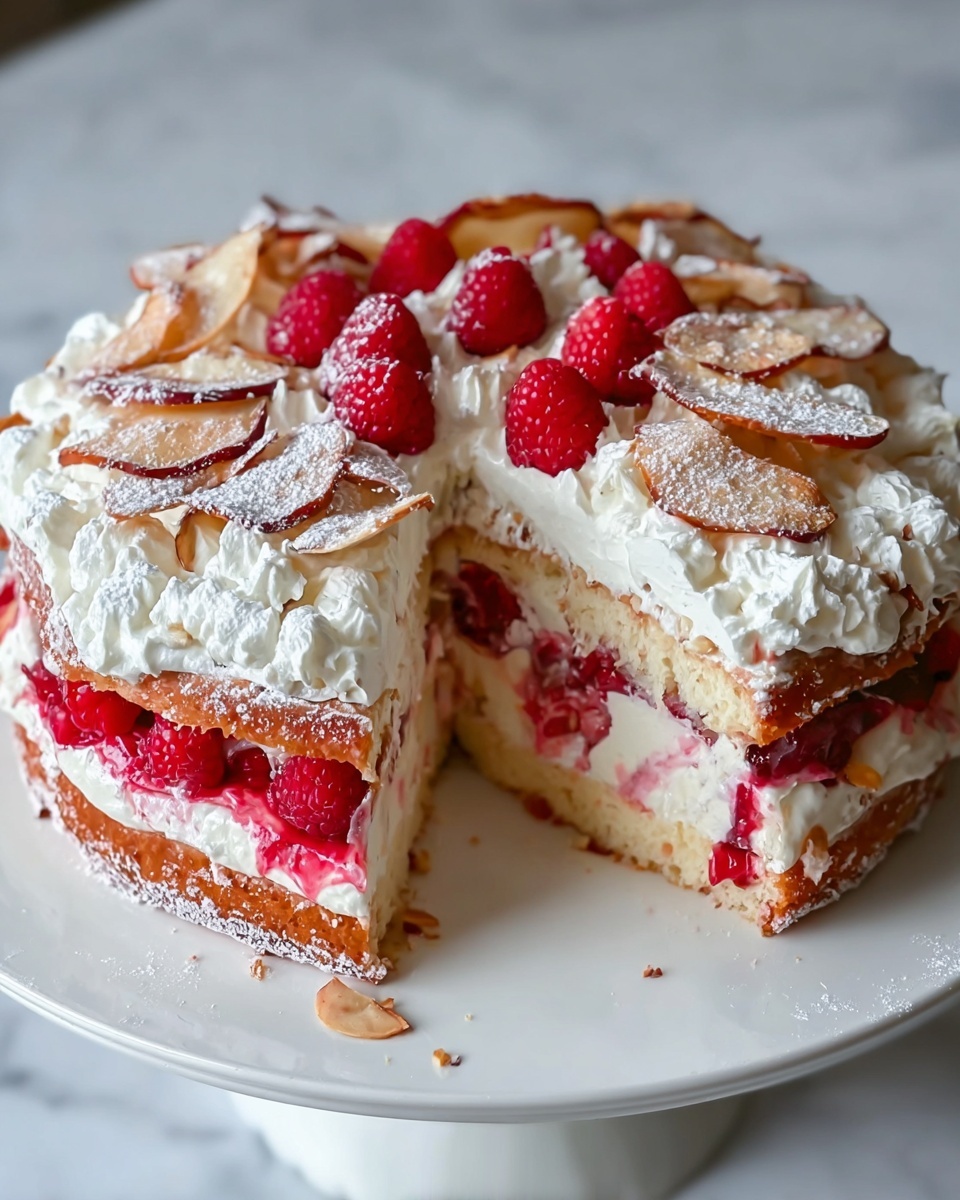
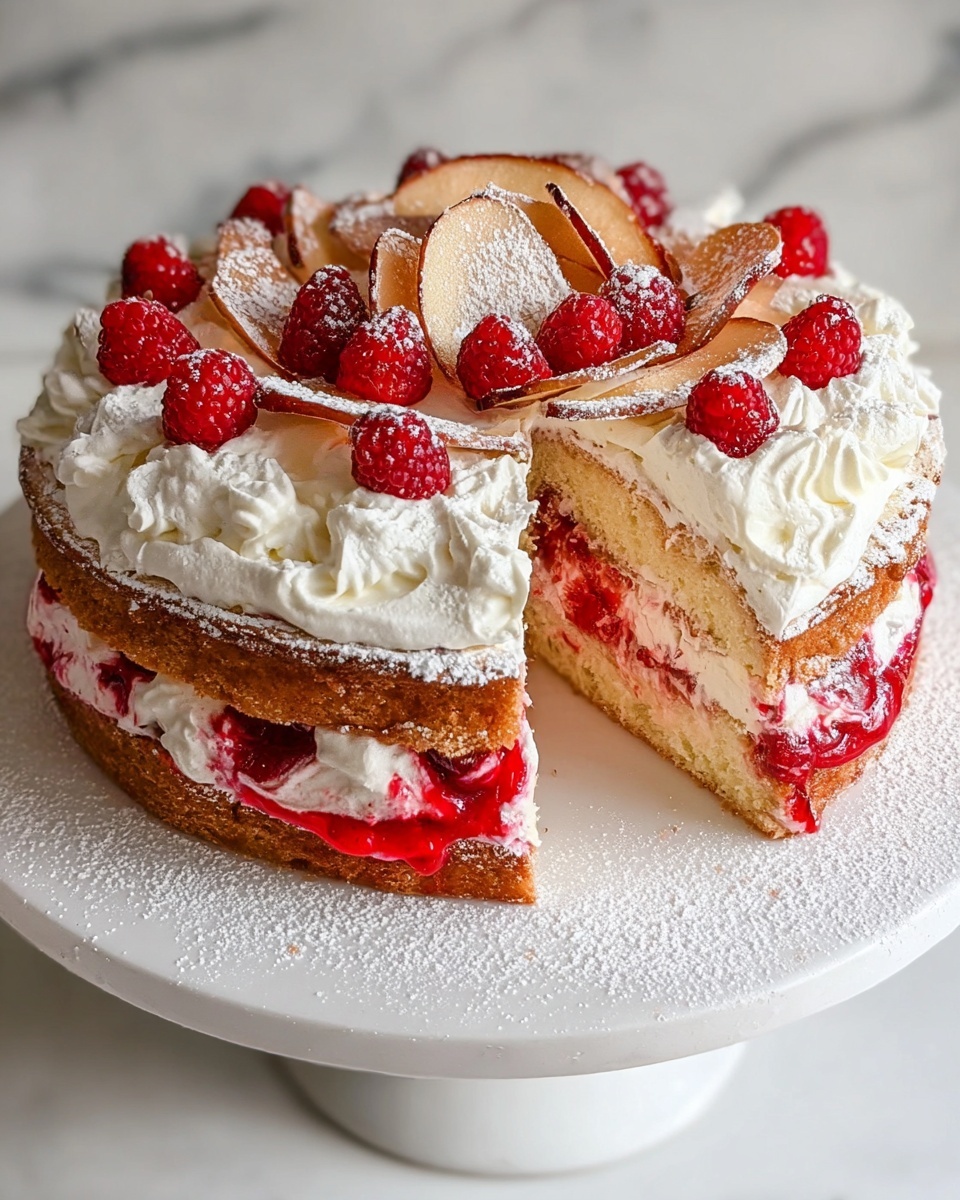
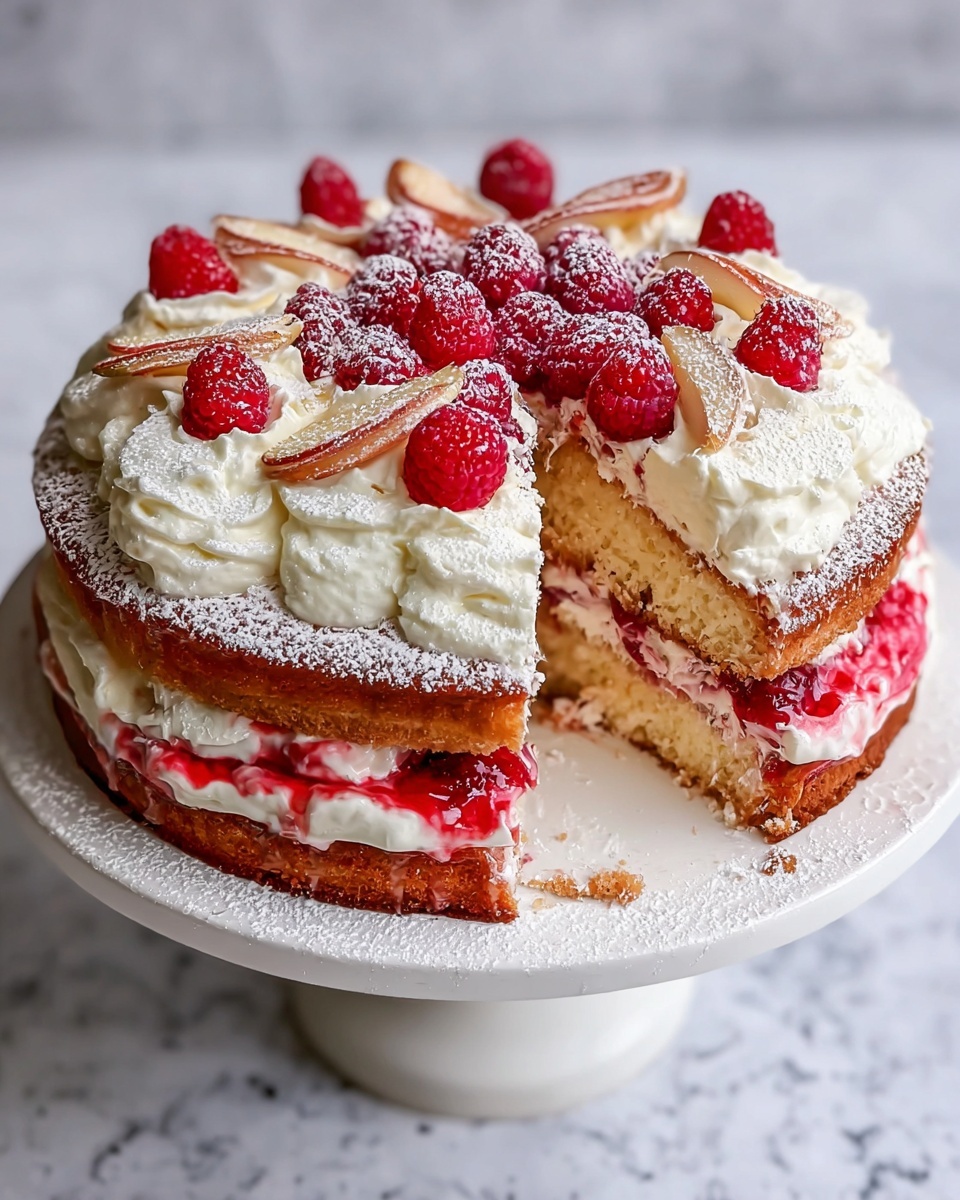
If you have been searching for a truly show-stopping dessert, look no further than this Classic Heavenly Celebration Cake Recipe. It’s everything you want in a cake: moist, tender layers of vanilla-infused goodness paired with creamy, luscious frosting that melts in your mouth. Whether you’re marking a birthday, anniversary, or simply craving an indulgent treat, this cake brings joy with every bite. The recipe’s perfectly balanced sweetness and smooth texture make it a treasured staple in any baker’s repertoire.
Ingredients You’ll Need
Gathering the right ingredients is half the fun and sets the foundation for incredible flavor and texture. Each one plays its part, from the fluffy flour base to the rich butter frosting that makes this cake irresistibly decadent.
- 2 cups All-purpose flour: Provides the perfect structure for a light and tender crumb.
- 1.5 cups Granulated sugar: Sweetens the cake while keeping it moist and delicious.
- 2 teaspoons Baking powder: Ensures the cake rises evenly for that classic fluffy texture.
- 0.5 teaspoon Salt: Enhances the flavors and balances the sweetness.
- 0.5 cups Unsalted butter (softened): Adds richness and a tender crumb for a truly satisfying bite.
- 3 large Eggs: Acts as a binding agent, lending structure and moisture to the cake layers.
- 1 cup Whole milk: Infuses the batter with moisture, keeping it soft and delicate.
- 1 tablespoon Vanilla flavoring: Brings a warm, fragrant note that elevates every mouthful.
- 4 cups Powdered sugar: The key to a silky, sweet frosting that crowns the cake beautifully.
- 1 cup Unsalted butter for frosting (softened): Creates a rich, creamy texture that’s simply irresistible.
- 2-4 tablespoons Milk for frosting: Adjusted to get the perfect spreadable consistency for frosting.
- Optional Food coloring: Adds a pop of color if you want to personalize your celebration cake.
How to Make Classic Heavenly Celebration Cake Recipe
Step 1: Prepare your oven and pans
Start by preheating your oven to 350°F (175°C). Grease two 9-inch round cake pans with butter, then dust lightly with flour. This simple prep step ensures your cake layers will release easily and maintain their perfect shape.
Step 2: Mix the dry ingredients
In a large bowl, whisk together the flour, granulated sugar, baking powder, and salt. Combining these upfront guarantees an even distribution of rising agents and sweetness, which is essential for uniform texture and taste.
Step 3: Add butter to dry mixture
Add the softened butter to the dry ingredients and mix on low speed until the mixture looks like coarse crumbs. This technique helps create that tender crumb everyone loves in a classic celebration cake.
Step 4: Whisk eggs with milk and vanilla
In a separate bowl, beat the eggs until smooth, then stir in the milk and vanilla extract. This flavorful liquid mixture will add moisture and subtle warmth to the cake batter.
Step 5: Combine wet and dry ingredients
Slowly pour the wet ingredients into the dry mixture while mixing on medium speed. Keep mixing until the batter is smooth and well combined but don’t overbeat—it’s the key to a light, fluffy cake.
Step 6: Divide and smooth the batter
Evenly distribute the batter between the prepared pans. Use a spatula to smooth the tops for an even bake and a neat presentation once the cakes are iced.
Step 7: Bake until golden and done
Bake the cakes for 25 to 30 minutes. Use a toothpick inserted into the center to check doneness; it should come out clean or with a few moist crumbs clinging to it.
Step 8: Cool your cakes properly
Let the cakes cool in their pans for 10 minutes to firm up, then gently invert them onto wire racks to cool completely. Proper cooling preserves the crumb texture and prevents the frosting from melting.
Step 9: Make the creamy frosting
Cream softened butter in a large bowl, then gradually add the powdered sugar and beat until fully combined. This forgiving frosting recipe is easy to whip up and perfectly sweet.
Step 10: Adjust frosting consistency
Add milk a tablespoon at a time while mixing to achieve a fluffy, spreadable frosting. If you want to get festive, now’s the moment to mix in your choice of food coloring.
Step 11: Assemble the cake layers
Place one cake layer on your serving plate and generously spread frosting over the top. The frosting not only adds flavor but also acts as a delicious glue for the layers.
Step 12: Frost the assembled cake
Position the second cake layer on top and cover the entire cake—top and sides—with the remaining frosting. The smooth finish invites endless decoration possibilities.
Step 13: Decorate and serve
Add any extra decorative touches you love, then slice and serve your Classic Heavenly Celebration Cake Recipe masterpiece. This is the moment where all your hard work turns into pure celebration joy.
How to Serve Classic Heavenly Celebration Cake Recipe
Garnishes
Fresh berries, edible flowers, or a sprinkle of shredded coconut add a beautiful contrast and extra layers of flavor. Even a simple dusting of powdered sugar can elevate your presentation from lovely to unforgettable.
Side Dishes
A dollop of whipped cream or a scoop of vanilla bean ice cream pairs wonderfully with this cake, balancing richness with a cool, creamy accent that delights the palate.
Creative Ways to Present
Try stacking mini versions for a charming tea party, or decorate with colored frosting to match your celebration theme. Presentation is your playground, and this recipe is a perfect canvas for your creativity.
Make Ahead and Storage
Storing Leftovers
Store any leftover cake in an airtight container at room temperature for up to 2 days or refrigerate for up to 4 days. Proper storage keeps the layers moist and the frosting fresh.
Freezing
Wrap cake layers tightly in plastic wrap and place in a freezer-safe container. Frozen for up to 3 months, these layers thaw beautifully and retain the taste and texture you love.
Reheating
Let frozen or refrigerated slices come to room temperature naturally before serving. If you prefer warm cake, a brief 10-15 second zap in the microwave softens the frosting and releases those heavenly aromas.
FAQs
Can I use oil instead of butter in this Classic Heavenly Celebration Cake Recipe?
Butter is essential here for the richness and flavor it imparts. Oil can make the cake moist but won’t create the same tender crumb or depth of flavor, so it’s best to stick with butter.
How do I know when the cake is perfectly baked?
The classic toothpick test works every time: insert a toothpick in the center, and if it comes out clean or with a few crumbs, your cake is ready to come out of the oven.
Can I make this cake gluten-free?
You can swap the all-purpose flour for a gluten-free blend, but be prepared for slight differences in texture. Adding a teaspoon of xanthan gum may help mimic the elasticity of wheat flour.
Is this frosting recipe suitable for piping decorations?
Absolutely! The frosting is smooth and holds its shape well once chilled, making it great for piping borders, rosettes, or any decorative touches.
How far in advance can I make this cake before serving?
This Classic Heavenly Celebration Cake Recipe can be made a day ahead and refrigerated. Just bring it back to room temperature before serving to enjoy the full flavors and softness.
Final Thoughts
This Classic Heavenly Celebration Cake Recipe is not just a dessert; it’s a celebration in every slice, effortlessly blending simple ingredients into something truly spectacular. From the first forkful to the last crumb, it’s a crowd-pleaser that will have everyone asking for your secret. I can’t wait for you to try it and make your own joyful memories!
Print
Classic Heavenly Celebration Cake Recipe
- Prep Time: 15 minutes
- Cook Time: 30 minutes
- Total Time: 45 minutes
- Yield: 12 servings
- Category: Dessert
- Method: Baking
- Cuisine: American
Description
This Classic Heavenly Cake is a moist, fluffy, and tender treat perfect for any celebration. Featuring a smooth vanilla-flavored cake layered with creamy, rich buttercream frosting, this recipe offers a timeless dessert experience that can be customized with optional food coloring for a festive touch.
Ingredients
Cake
- 2 cups All-purpose flour (Provides structure for the cake.)
- 1.5 cups Granulated sugar (Sweetens the cake and contributes to moistness.)
- 2 teaspoons Baking powder (Leavening agent for proper rise.)
- 0.5 teaspoon Salt (Enhances flavor.)
- 0.5 cups Unsalted butter, softened (Adds richness and moisture.)
- 3 large Eggs (Binding agent that adds structure.)
- 1 cup Whole milk (Adds moisture and tenderness.)
- 1 tablespoon Vanilla flavoring (Enhances overall flavor.)
Frosting
- 4 cups Powdered sugar (Essential for creamy frosting.)
- 1 cup Unsalted butter, softened (Provides rich flavor.)
- 2–4 tablespoons Milk (For desired frosting consistency.)
- Optional: Food coloring (To add color to frosting.)
Instructions
- Preheat oven and prepare pans: Preheat your oven to 350°F (175°C) and prepare two 9-inch round cake pans by greasing them with butter and dusting with flour to prevent sticking.
- Mix dry ingredients: In a large mixing bowl, combine the all-purpose flour, granulated sugar, baking powder, and salt. Whisk thoroughly until well mixed to ensure even distribution.
- Add softened butter: Incorporate the softened unsalted butter into the dry ingredients and mix on low speed until the mixture resembles coarse crumbs, which helps create a tender crumb.
- Prepare wet mixture: In a separate bowl, whisk the eggs, then add the whole milk and vanilla flavoring. Mix until fully combined, forming the wet batter base.
- Combine wet and dry mixtures: Gradually pour the wet mixture into the dry ingredients while mixing on medium speed. Continue until the batter is smooth and homogenous.
- Divide batter and smooth: Evenly divide the batter between the prepared cake pans and smooth the tops with a spatula to ensure uniform baking.
- Bake the cakes: Bake in the preheated oven for 25-30 minutes. Check doneness by inserting a toothpick into the center; it should come out clean when the cakes are done.
- Cool the cakes: Allow the cakes to cool in the pans for 10 minutes, then invert them onto wire racks to cool completely, preventing sogginess.
- Prepare frosting: In a mixing bowl, cream the softened butter until smooth, then gradually add powdered sugar, mixing well after each addition until combined.
- Adjust frosting consistency: Add milk in small increments to achieve desired consistency and continue mixing until the frosting is light and fluffy. Add food coloring if desired to customize appearance.
- Assemble the cake: Place one cooled cake layer on a serving plate and spread an even layer of frosting over the top.
- Add the second layer and frost: Place the second cake layer on top of the first and apply frosting evenly on top and around the sides for a smooth finish.
- Decorate and serve: Decorate the cake as desired with additional decorations or piping, then serve for your celebration.
Notes
- Ensure all ingredients, especially butter and eggs, are at room temperature to achieve the best texture.
- Do not overmix the batter after adding liquids to avoid a dense cake.
- If food coloring is used, add it gradually to avoid overly vibrant colors.
- Use a toothpick or cake tester to check for doneness before removing the cakes from the oven.
- The frosting consistency can be adjusted with milk to be thicker or thinner depending on preference.

