
If you have a sweet tooth and love treats that combine creamy, crunchy, and chocolatey textures, you are absolutely going to adore this Butterfinger Balls Recipe. These little delights are a playful spin on classic candy bars, packed with rich peanut butter, buttery crunch, and a dreamy chocolate coating that sets them apart. Whether you’re serving them up at a party or just indulging in a homemade treat, Butterfinger Balls make every bite pure bliss and are incredibly simple to whip up with just a handful of ingredients.
Ingredients You’ll Need
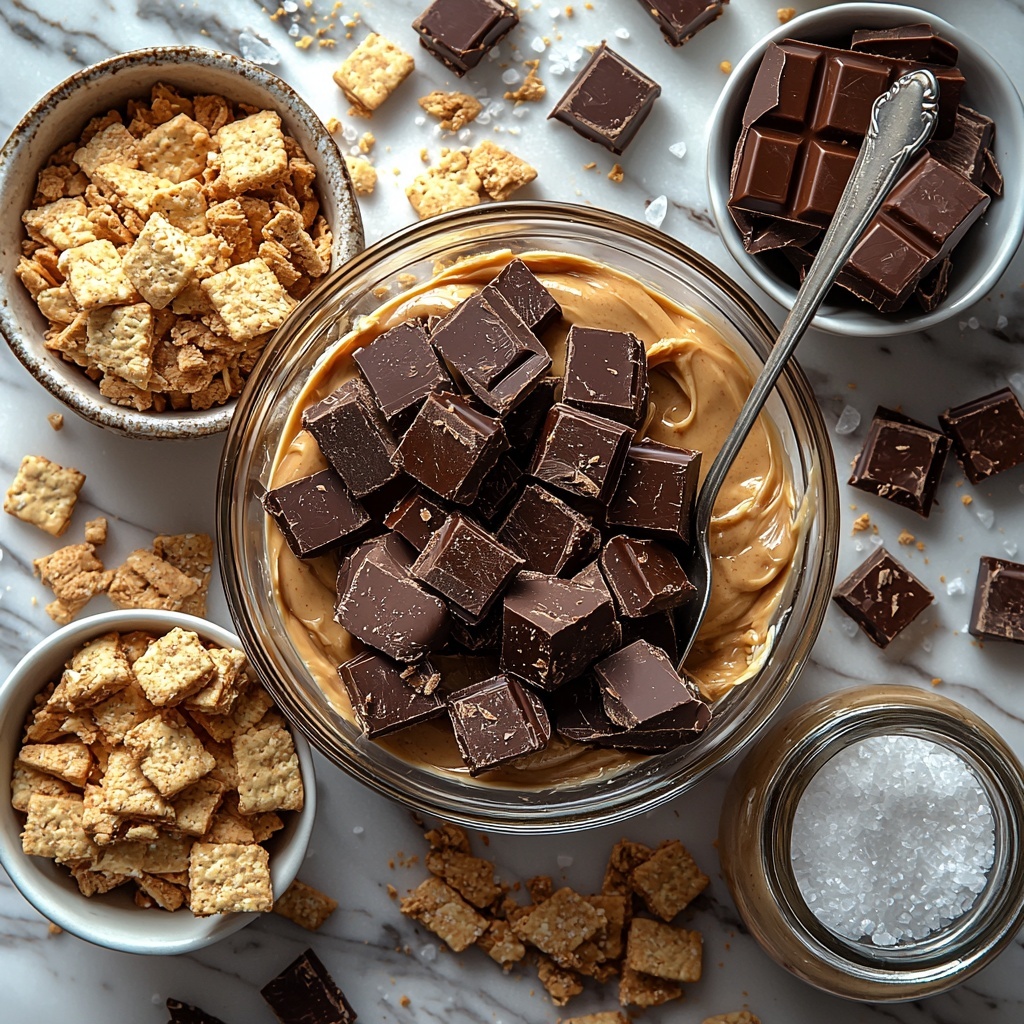
Getting ready to make Butterfinger Balls is a breeze because the ingredients are straightforward yet essential, each adding its own unique layer of flavor and texture. From the creamy smoothness of peanut butter to the satisfying crunch of Butterfinger bars, every component contributes to the magic of this recipe.
- 4 tablespoons softened butter: Adds a rich, creamy base that helps bind the mixture together smoothly.
- 1 cup creamy peanut butter: Brings that classic nutty flavor and luscious creaminess that defines these balls.
- 1 cup powdered sugar: Sweetens the mix perfectly without overpowering.
- ¾ cup crushed graham crackers: Gives a subtle crunch and a touch of warmth and depth.
- ½ cup crushed Butterfinger bars: Provides the iconic crispy, flaky texture that makes these bites so special.
- 8 ounces chocolate bark or chips: Melts into a smooth, glossy shell that encases each ball in decadent chocolate.
- Optional garnishes (additional crushed Butterfinger bars, sprinkles, sea salt): These add a fun visual and flavor boost for that finishing touch.
How to Make Butterfinger Balls Recipe
Step 1: Cream the Base
Start by blending the softened butter and creamy peanut butter together in a mixing bowl until the mixture is silky smooth. This creates a luscious, rich foundation that holds everything together beautifully.
Step 2: Sweeten and Mix
Add vanilla extract, then gradually stir in the powdered sugar to the bowl. This step turns the creamy mixture into a sweet, dough-like consistency that’s easy to shape. Mixing slowly ensures the sugar dissolves nicely without any gritty texture.
Step 3: Fold in Crunch
Gently fold in the crushed graham crackers and the crushed Butterfinger bars until everything is evenly dispersed. The crushed Butterfinger bars give these balls their signature crisp and satisfyingly flaky texture.
Step 4: Shape Into Balls
Using your hands or a scoop, roll the mixture into balls about 1 to 1½ tablespoons in size. Place them on a parchment-lined cookie sheet to keep them from sticking and to make handling easier.
Step 5: Chill and Set
Pop the cookie sheet into the freezer for about 30 minutes. This chilling time firms up the balls so they are easy to dip and handle without losing their shape.
Step 6: Melt the Chocolate
In a microwave-safe bowl, melt the chocolate bark or chips in 30-second intervals, stirring in between. This helps the chocolate reach a smooth, silky consistency perfect for coating.
Step 7: Dip and Decorate
Coat each chilled ball in the melted chocolate, covering them completely. Place them back on the parchment paper for the chocolate to set. At this stage, you can add any optional garnishes to make them look as irresistible as they taste.
How to Serve Butterfinger Balls Recipe
Garnishes
Sprinkling a little extra crushed Butterfinger bar or sea salt not only enhances the look of your Butterfinger Balls but also adds a punch of texture and flavor contrast. Sprinkles can bring a colorful, festive vibe if you’re serving at a party.
Side Dishes
Butterfinger Balls pair wonderfully with a scoop of vanilla ice cream or a mug of hot coffee or milk. The creamy coldness or warm beverage perfectly balances the rich, crunchy sweetness of these treats.
Creative Ways to Present
Try presenting Butterfinger Balls on a tiered dessert stand with some fresh berries or mint sprigs for a vibrant contrast. Wrapping each ball in decorative cupcake liners also adds charm and makes them easy to grab and enjoy.
Make Ahead and Storage
Storing Leftovers
If you happen to have leftovers from your Butterfinger Balls Recipe, store them in an airtight container in the refrigerator to keep the chocolate coating firm and the centers fresh. They will stay delicious for up to a week.
Freezing
Butterfinger Balls freeze beautifully! Place them in a single layer on a tray until firm, then transfer to a freezer-safe container. They can be kept frozen for up to two months, perfect for making ahead for unexpected guests or holiday treats.
Reheating
No need to reheat! Butterfinger Balls are best enjoyed chilled or at room temperature. If the chocolate has hardened too much, simply let them sit out for a few minutes to soften slightly before serving.
FAQs
Can I use crunchy peanut butter instead of creamy?
Absolutely! Using crunchy peanut butter will add an extra layer of texture inside the balls. Just keep in mind that it might slightly change the smoothness of the mixture but will still be delicious.
What if I can’t find Butterfinger bars?
If Butterfinger bars are hard to come by, you can substitute with a similar candy bar that has a crispy or flaky texture, such as Butterfinger’s close relatives or even chopped Heath bars. Just adjust the amount to your taste.
Is it necessary to chill the balls before dipping in chocolate?
Yes, chilling the balls helps them firm up so they do not lose their shape when dipped. If you skip this step, they may become too soft and difficult to coat evenly.
Can I make these nut-free?
Since peanut butter is a core ingredient, making them truly nut-free would require a different approach. You could try substituting with a seed butter like sunflower seed butter, but the flavor and texture will differ.
How long does it take for the chocolate coating to set?
The chocolate coating typically sets within 15 to 30 minutes at room temperature, but for quicker results, you can refrigerate the balls for about 10 minutes until the chocolate hardens completely.
Final Thoughts
Making the Butterfinger Balls Recipe is such a fun and rewarding experience, especially when you get to share these chewy, crunchy, chocolate-coated gems with friends and family. Once you taste that perfect balance of peanut butter richness, crispy Butterfinger crunch, and smooth chocolate, you’ll want to make these again and again. So grab your ingredients, dive into the process, and treat yourself to this wonderfully addictive dessert!
Print
Butterfinger Balls Recipe
- Prep Time: 15 minutes
- Cook Time: 2 minutes (for melting chocolate)
- Total Time: 17 minutes plus 30 minutes freezing
- Yield: 16 servings
- Category: Dessert
- Method: No-Cook
- Cuisine: American
Description
Delicious and easy-to-make Butterfinger Balls combine creamy peanut butter, crushed Butterfinger bars, and graham crackers, all coated in rich chocolate. These no-bake treats are perfect for parties, snacks, or satisfying your sweet tooth with minimal effort.
Ingredients
Base Mixture
- 4 tablespoons softened butter
- 1 cup creamy peanut butter
- 1 cup powdered sugar
- ¾ cup crushed graham crackers
- ½ cup crushed Butterfinger bars
- 1 teaspoon vanilla extract
Chocolate Coating
- 8 ounces chocolate bark or chocolate chips
Optional Garnishes
- Additional crushed Butterfinger bars
- Sprinkles
- Sea salt
Instructions
- Combine Butters: In a mixing bowl, combine the softened butter and creamy peanut butter. Blend them together until the mixture is smooth and well incorporated.
- Add Vanilla and Sugar: Mix in the vanilla extract, then gradually add the powdered sugar while continuing to blend, ensuring the mixture remains smooth and even.
- Fold in Crunchy Ingredients: Gently fold in the crushed graham crackers and crushed Butterfinger bars until they are evenly distributed throughout the mixture.
- Shape the Balls: Roll the mixture into balls about 1 to 1½ tablespoons in size. Place them on a cookie sheet lined with parchment paper to prevent sticking.
- Freeze to Firm Up: Place the cookie sheet in the freezer for approximately 30 minutes until the balls are firm and easy to handle for coating.
- Melt the Chocolate: Melt the chocolate bark or chips in a microwave-safe bowl by heating in 30-second intervals, stirring after each, until the chocolate is fully smooth and melted.
- Coat the Balls: Using a fork or dipping tool, coat each ball thoroughly in the melted chocolate. Return each coated ball to the parchment-lined cookie sheet.
- Add Garnishes and Set: Before the chocolate sets, sprinkle optional crushed Butterfinger bars, sprinkles, or a pinch of sea salt on top. Allow the chocolate to fully set at room temperature or in the refrigerator.
Notes
- Ensure butter is softened for easier mixing.
- Crush the Butterfinger bars finely but not to powder for best texture.
- If chocolate thickens when melting, stir continuously and avoid overheating.
- Store finished Butterfinger Balls in an airtight container in the refrigerator for up to one week.
- For a nut-free version, substitute peanut butter with seed butter, but note the flavor difference.

