
“`html
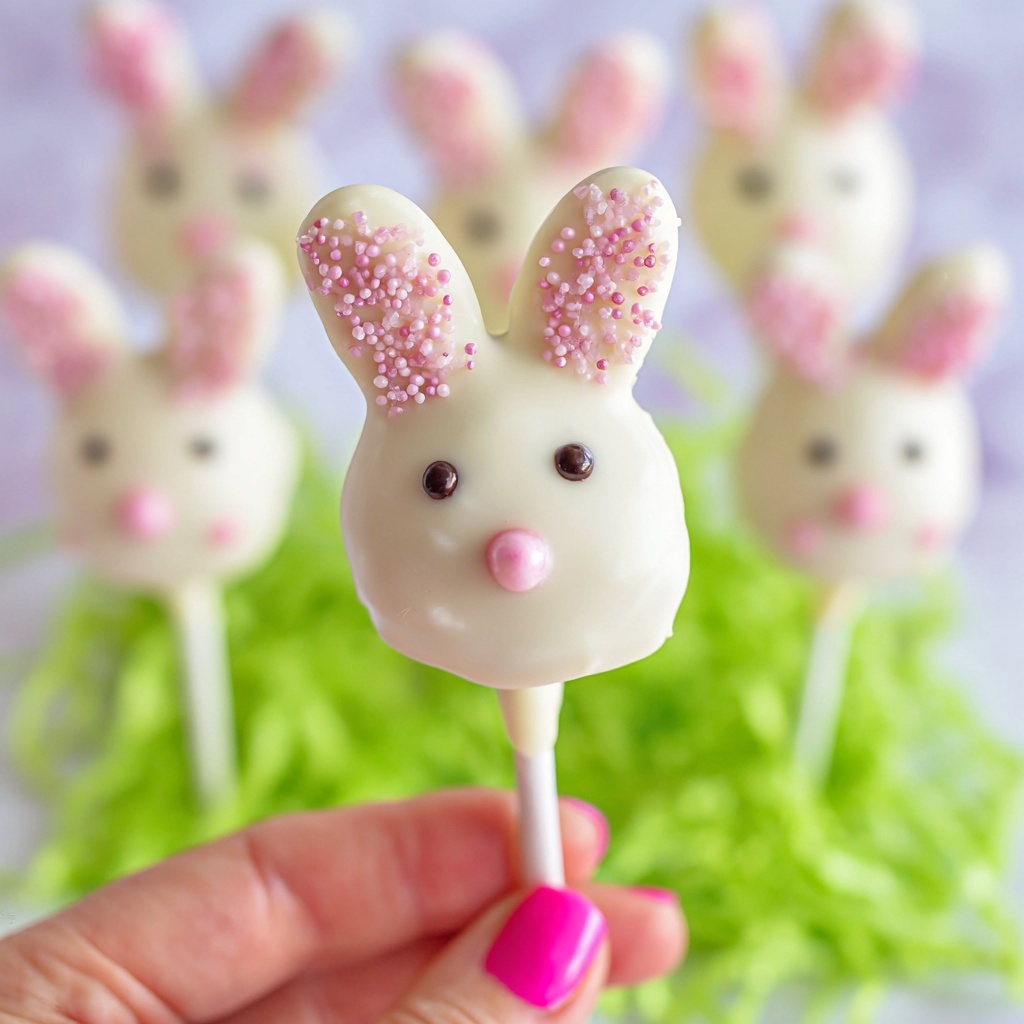
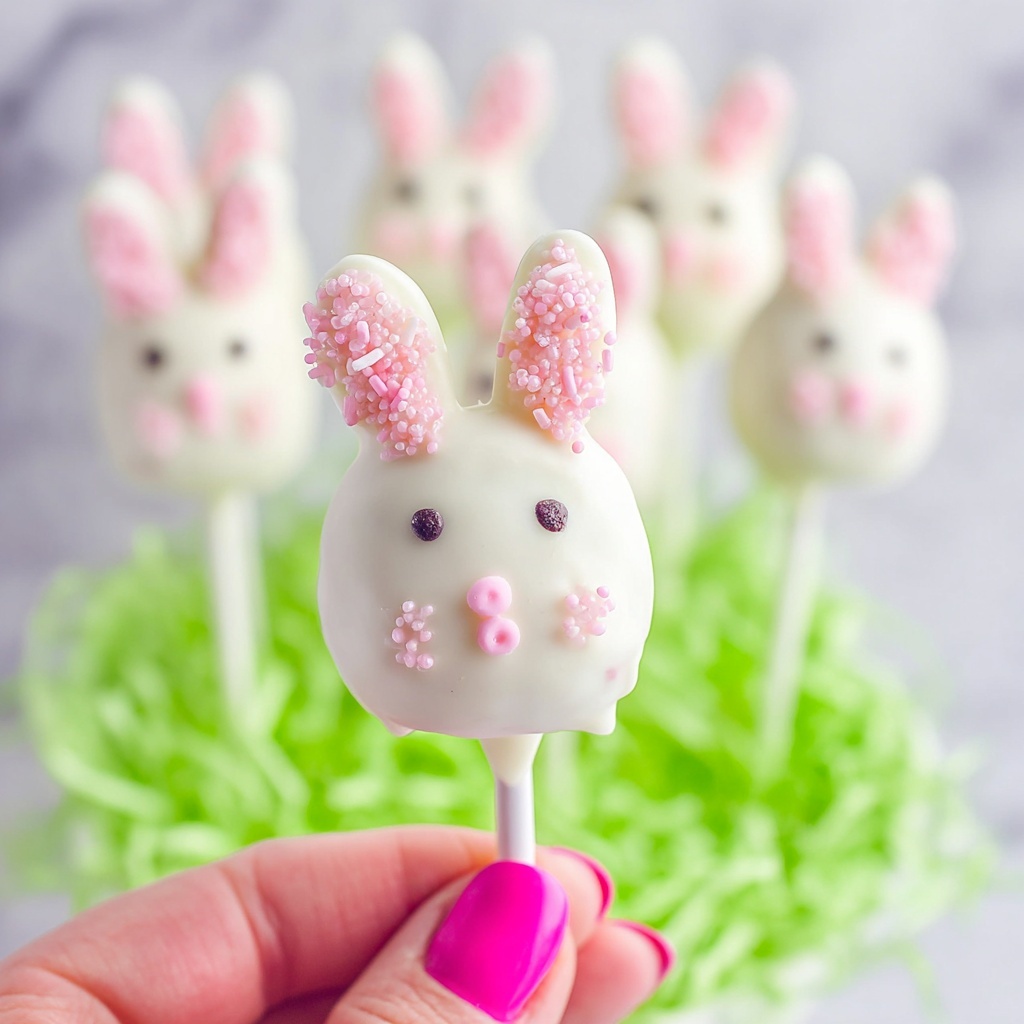
If you are looking for an irresistibly fun and festive treat to brighten up your spring celebrations, this Easter Cake Pops Recipe is an absolute must-try. These adorable bunny-shaped cake pops combine a moist homemade vanilla cake with creamy cream cheese frosting, all dipped in smooth white candy melts and decorated with charming touches like pink sanding sugar and mini marshmallows. They aren’t just scrumptious, but also a delightful way to bring smiles to kids and adults alike, making your Easter table truly unforgettable.
Ingredients You’ll Need
This Easter Cake Pops Recipe relies on simple, pantry-friendly ingredients that come together to create a perfect balance of flavor and texture. Each ingredient plays a vital role, whether it’s the buttery richness of the cake, the sweetness of the frosting, or the crisp, colorful finish from the candy melts and sanding sugar.
- ½ cup butter (unsalted, room temperature): Provides moisture and richness for a tender crumb.
- ¾ cup granulated sugar: Sweetens the cake and helps create a light texture.
- 2 eggs: Bind everything together and add structure.
- 2 tsp vanilla extract: Infuses a warm, comforting flavor throughout the cake.
- 1 cup all-purpose flour: The base that forms the cake’s structure.
- 1 tsp baking powder: Gives the cake lift and fluffiness.
- ½ tsp salt: Balances sweetness and enhances flavor.
- ¼ cup cream cheese frosting (whipped, plus more if needed): Makes the cake moist and helps shape the pops.
- 14 oz. white candy melts: For dipping the pops into a beautiful, glossy coating.
- Pink sanding sugar: Adds sparkle and a pretty pastel touch.
- Mini marshmallows (pink and white): Perfect for creating adorable bunny ears, noses, and tails.
How to Make Easter Cake Pops Recipe
Step 1: Prepare the Cake Batter
Start by preheating your oven to 350 degrees and lining an 8-inch round cake pan with parchment paper to ensure easy removal. Cream the butter and sugar together until light and fluffy—this is crucial for a tender cake. Beat in the eggs one at a time along with the vanilla extract for that lovely home-baked aroma. Then, whisk your dry ingredients and gradually mix them in until the batter is smooth and uniform.
Step 2: Bake the Cake
Pour the batter into your prepared pan and bake for about 25 minutes or until a tester comes out clean. Once your cake has baked to a beautiful golden color, allow it to cool for around 40 minutes. This step is essential because handling warm cake will make shaping your pops tricky.
Step 3: Form the Cake Pops Mixture
Once cooled, crumble the cake into fine crumbs using your hands or a food processor. Add the whipped cream cheese frosting and mix well until the mixture sticks together without any dry crumbs. This is the magic step that transforms cake into cake pops! Using a medium cookie scoop, portion out the dough and roll into smooth balls with your palms.
Step 4: Shape the Bunny Ears
Take small portions of the cake mixture, roll them into miniature sausages, and carefully shape them into bunny ears. Attach each ear by gently pressing them onto the cake balls. Place all shaped cake pops in a container and chill in the freezer for 15 minutes to firm up before dipping.
Step 5: Melt the Candy Coating
In a microwave-safe container, melt the white candy melts in 20-second bursts, stirring gently in between until silky smooth. Keep the melted chocolate warm to ensure easy and even coating of your pops.
Step 6: Prepare Cake Pops for Dipping
Remove the chilled cake pops from the freezer and transfer them to the refrigerator while you work. This keeps them firm yet ready for dipping.
Step 7: Insert Sticks and Dip
Dip a lollipop stick into the melted candy and insert it into the base of a bunny cake pop for secure holding. Then dip each pop into the candy melt coating, ears side down, fully covering the cake with no crumbs showing. Let excess drip off before placing the stick in a foam block to set. Repeat for all cake pops, reheating the candy melt as needed for smoothness.
Step 8: Add Decorative Details
Use a piping bag or cocktail stick to draw fine lines on the ears with melted chocolate, then immediately sprinkle with pink sanding sugar for a cute textured effect. Add little feet at the bottom with the chocolate, dusting paws with sanding sugar. Draw eyes with an edible ink marker. Cut a tiny bunny nose from a pink mini marshmallow and attach it with a touch of chocolate.
Step 9: Finish the Face and Tail
Complete the bunny’s mouth with the edible marker. Add a small dab of chocolate to the lower back and attach a white mini marshmallow as a fluffy bunny tail. Use a cocktail stick to texture the marshmallow with more chocolate for a “furry” look. Let everything set properly before serving.
Step 10: Let Cake Pops Set and Enjoy
Allow your beautiful Easter cake pops to fully set so the chocolate hardens and decorations stay in place. Then, get ready to enjoy a delicious springtime treat that’s just as fun to look at as it is to eat!
How to Serve Easter Cake Pops Recipe
Garnishes
To enhance these festive cake pops, consider adding pastel-colored sprinkles or edible glitter along with the pink sanding sugar for extra sparkle. A light dusting adds a joyful touch that captures the essence of Easter celebrations perfectly.
Side Dishes
These cake pops pair beautifully with light, refreshing sides like a spring fruit salad or a chilled lemonade. Their sweetness and charm make them a delightful dessert or snack alongside anything fresh and vibrant.
Creative Ways to Present
Display your Easter Cake Pops Recipe by arranging the pops in a colorful foam block wrapped in pastel paper or nestled in a basket filled with shredded paper grass. Tie each stick with a tiny ribbon or a mini tag wishing Happy Easter for a personal, eye-catching presentation sure to impress your guests.
Make Ahead and Storage
Storing Leftovers
If you have any Easter cake pops left over, place them in an airtight container and refrigerate for up to five days. Keeping them chilled helps preserve their shape and freshness without drying out the cake or melting the coating.
Freezing
You can freeze these cake pops by arranging them in a single layer on a baking sheet until firm, then transferring them to a freezer-safe container. They will keep well for up to one month and can be thawed overnight in the refrigerator when you’re ready to enjoy.
Reheating
Because these cake pops are coated in chocolate, reheating is not really necessary or recommended. Instead, simply bring them to room temperature before serving if taken out of the fridge or freezer, allowing the flavors and textures to shine.
FAQs
Can I use store-bought cake instead of baking one from scratch?
Absolutely! Using a pre-made cake is a time-saving shortcut that works well for this recipe. Just make sure the cake is fresh and crumbly enough to mix easily with the frosting for shaping.
What if I don’t have a food processor to crumble the cake?
No worries at all! You can crumble the cooled cake easily by hand, breaking it apart into fine crumbs right in a large bowl. Take your time to avoid overly large chunks.
How do I make sure the cake pops don’t fall off the sticks?
Dipping the stick in melted candy before inserting into the cake helps glue it in place. Also, chilling the pops before dipping makes them firmer and less likely to slide off during coating.
Can I substitute the white candy melts for another color?
Definitely! Candy melts come in a variety of colors, so feel free to use pastel shades or bright colors to match your Easter theme and create pops that suit your style perfectly.
Is it possible to make these gluten-free?
Yes, just swap the all-purpose flour for a gluten-free blend suitable for baking. Make sure your other ingredients, like frosting and candy melts, are certified gluten-free to keep the recipe safe.
Final Thoughts
This Easter Cake Pops Recipe is such a joyous way to celebrate the season with sweetness and creativity all wrapped into one bite-sized delight. From baking the cake to adding the final decorative touches, every step fills you with anticipation and warmth. Give this recipe a try, and you’ll soon have a batch of charming bunny pops that everyone can’t wait to dig into. Happy baking and joyful Easter celebrations!
“`
Print
Easter Cake Pops Recipe
- Prep Time: 65 minutes
- Cook Time: 25 minutes
- Total Time: 1 hour 30 minutes
- Yield: 15 cake pops
- Category: Dessert
- Method: Baking
- Cuisine: American
Description
Delightfully cute Easter Cake Pops featuring moist vanilla cake balls coated in smooth white chocolate and decorated with pink sanding sugar, mini marshmallows, and edible details to resemble charming bunnies. Perfect for festive celebrations and family fun.
Ingredients
Cake Batter
- ½ cup unsalted butter, room temperature
- ¾ cup granulated sugar
- 2 large eggs
- 2 tsp vanilla extract
- 1 cup all-purpose flour
- 1 tsp baking powder
- ½ tsp salt
Filling
- ¼ cup cream cheese frosting, whipped (more if needed)
Coating and Decorations
- 14 oz white candy melts
- Pink sanding sugar
- Mini marshmallows (pink and white)
Instructions
- Prepare the batter: Preheat the oven to 350°F (175°C). Line an 8-inch round cake pan with parchment paper. In a stand mixer fitted with the paddle attachment, beat the butter for 15 seconds until smooth. Add sugar and beat on medium speed for 5 minutes until the mixture is light yellow. Incorporate vanilla extract and eggs one at a time, mixing on low speed until combined. In a separate medium bowl, whisk together the flour, baking powder, and salt. Gradually add the dry ingredients to the wet ingredients, mixing until just combined.
- Bake the cake: Pour the batter into the prepared cake pan and smooth the top. Bake for 25 minutes or until a cake tester inserted into the center comes out clean and cake is golden. Remove from oven and allow to cool in the pan for about 40 minutes before proceeding.
- Form the cake pops base: Once cooled, crumble the cake using a food processor or your hands into a large bowl. Add the cream cheese frosting and mix thoroughly until the mixture holds together well with no dry crumbs visible. Using a medium cookie scoop, portion out the mixture and roll into round balls between your palms.
- Create bunny ears: Take a small portion of the cake mixture, roll it into a ball, then shape into sausage forms. Mold these sausage shapes into ears and attach to each cake ball by gently pressing them into place. Repeat for all pops. Transfer the cake pops to a container and chill in the freezer for 15 minutes.
- Melt the candy coating: In a small microwave-safe container, melt candy melts in 20-second increments, stirring well between each, until smooth and fully melted.
- Prepare cake pops for dipping: Remove cake pops from the freezer and transfer to the refrigerator to keep chilled as you work. Work with one cake pop at a time.
- Insert lollipop sticks and dip: Dip a lollipop stick into the melted candy coating and insert into the base of the cake pop. Then dip the entire cake pop chocolate ears side down into the melted candy until fully coated. Allow excess coating to drip off. Place stick into a foam block to set. Repeat with remaining cake pops, warming candy melts as needed to maintain smooth consistency.
- Add decorative details: Using a piping bag or cocktail stick, pipe chocolate lines onto the ears and immediately sprinkle with pink sanding sugar. Pipe feet onto the bottom of the cake pop, dusting with sanding sugar on paws. Use an edible ink marker to draw eyes. Cut small bunny noses from pink mini marshmallows using scissors or a small knife and attach with melted chocolate.
- Complete bunny features: Use the edible marker to draw the bunny’s mouth. Attach a white mini marshmallow to the lower back of the cake pop with a small dab of melted chocolate to form the tail.
- Texture the tail and finish: Coat the tail marshmallow with melted chocolate using a cocktail stick, creating a furry texture. Allow all cake pops to fully set before enjoying.
Notes
- Ensure cake is completely cooled before crumbling to prevent soggy pops.
- If mixture feels too dry, add a little more cream cheese frosting to bind.
- Work quickly when dipping cake pops to maintain smooth coating.
- Keep melted chocolate warm by microwaving in short bursts to avoid hardening.
- Use foam block or similar holder to let cake pops dry upright for best results.
- Edible ink markers are food safe and widely available for decorating.
- Store finished cake pops in an airtight container in the refrigerator to keep fresh.


