
If you have ever wanted to bake soft, fluffy, and utterly irresistible bread that melts in your mouth, then you are in for a treat with this Easy Yeast Rolls for Beginners Recipe. It is designed to take you step-by-step through making classic yeast rolls that come out perfectly every time, even if you have never worked with yeast dough before. These rolls are golden, tender, and wonderfully buttery, making them ideal for everything from holiday dinners to casual family meals. You’ll find that with just a few simple ingredients and a little patience, you can create bakery-quality rolls right in your own kitchen and impress everyone at the table.

Ingredients You’ll Need
These ingredients are so straightforward yet vital for achieving that perfect texture and flavor. Each one plays a unique role: flour gives structure, sugar feeds the yeast, and instant potato flakes add an amazing softness you’ll love.
- 3 cups all-purpose flour: The base of your dough, providing structure and chew.
- 2 tablespoons sugar: Just enough sweetness to balance the savory notes and help yeast activate.
- 2 teaspoons instant yeast: The magical leavening agent that makes your rolls rise beautifully.
- 1 teaspoon salt: Enhances all the flavors and controls yeast activity.
- ¼ cup dry milk powder: Adds richness and tender crumb, similar to adding butter for flavor.
- ½ cup instant potato flakes: Keeps the rolls extra moist and soft for days.
- 5 tablespoons melted butter, divided: Half goes into the dough for tenderness, and the rest for a buttery finish.
- 1 cup warm water (105-115°F): Activates the yeast and hydrates the dough perfectly.
How to Make Easy Yeast Rolls for Beginners Recipe
Step 1: Mix and Knead the Dough
Start by combining the flour, sugar, yeast, salt, dry milk powder, instant potato flakes, 4 tablespoons of melted butter, and warm water in the bowl of a stand mixer fitted with the dough hook. Mix everything together until it starts to form a dough, then knead on low speed for about five minutes. This helps develop the gluten that will give your rolls their wonderful chewy texture without being tough.
Step 2: First Rise
Shape your dough into a smooth ball and place it in a greased bowl. Cover it tightly with a clean towel or plastic wrap and let it rise at room temperature until it has doubled in size, which usually takes 60 to 90 minutes. If your kitchen is chilly, no worries—pop the bowl into a warm oven (100-150 degrees Fahrenheit) that’s been turned off. This will give it a cozy spot to rise more quickly.
Step 3: Shape the Rolls
Once your dough has doubled, gently turn it out onto a lightly floured surface. Divide it evenly into 12 pieces, rolling each into a smooth ball with your hands. Place the rolls into a greased 9-inch cake pan, leaving a little space between them so they have room to expand. Cover again and let them rise until doubled, which should take 45 to 60 minutes. This second rise is key for a light, fluffy crumb.
Step 4: Preheat the Oven
About 20 minutes before your rolls are ready to bake, set your oven to preheat at 350°F. This ensures that it will be hot enough to create a perfect golden crust.
Step 5: Bake Until Golden Brown
Remove the cover from your rolls and slide the pan right into the preheated oven. Bake for 18 to 20 minutes, or until the tops turn a gorgeous golden brown. Your kitchen will start to smell amazing, signaling that it is almost time to enjoy your freshly baked rolls.
Step 6: Butter ‘Em Up
Immediately after pulling the rolls from the oven, brush the tops with the remaining tablespoon of melted butter. This adds a luscious shine and buttery flavor to the crust that makes these rolls incredibly hard to resist. Let them sit for about five minutes to absorb all that delicious buttery goodness before serving.
How to Serve Easy Yeast Rolls for Beginners Recipe
Garnishes
A little extra touch can elevate your yeast rolls to a special occasion status. Consider sprinkling some flaky sea salt or fresh chopped herbs like parsley or rosemary on top of the buttered rolls right before serving. These simple garnishes add a lovely layer of flavor and a beautiful presentation.
Side Dishes
These rolls are incredibly versatile and pair beautifully with a wide range of dishes. They are perfect alongside hearty soups like chicken noodle or creamy tomato basil, as well as stews, roasted meats, or even a fresh salad. Their soft texture makes them ideal for soaking up sauces and gravies.
Creative Ways to Present
For a fun twist, turn your rolls into mini sliders by slicing them horizontally and filling with your favorite sandwich ingredients like ham and cheese, turkey with cranberry sauce, or even a mix of melted brie and fig jam. You can also arrange the rolls in a pull-apart style on a platter for easy sharing that invites everyone to dig in.
Make Ahead and Storage
Storing Leftovers
To keep your delicious rolls fresh, store any leftovers in an airtight container at room temperature. They stay soft and tasty for up to two days, but make sure you keep the container sealed to prevent drying out.
Freezing
If you want to enjoy these rolls later, freezing is a fantastic option. Once the rolls have completely cooled, wrap them individually or in a batch tightly with plastic wrap and aluminum foil, then freeze for up to three months. When you’re ready to eat, thaw at room temperature overnight.
Reheating
To bring back that just-baked softness, warm your rolls in the oven at 300°F for about 10 to 15 minutes. You can also microwave them wrapped in a slightly damp paper towel for 15 to 20 seconds. Don’t forget a quick brush of butter post-reheating for that fresh-from-the-oven flavor.
FAQs
Can I use active dry yeast instead of instant yeast?
Yes, you can substitute active dry yeast, but you should dissolve it in warm water for about 5 minutes before mixing with other ingredients. Instant yeast works directly with the dry ingredients, so it’s just a bit more convenient for beginners.
What if my dough doesn’t rise?
If your dough isn’t rising, it might be due to water temperature, old yeast, or a cold room. Make sure your water is between 105-115°F, your yeast hasn’t expired, and provide a warm environment for rising, like a turned-off oven or near a radiator.
Can I make these rolls gluten-free?
This recipe relies on gluten for its texture, so it’s best made with all-purpose flour. However, if you want gluten-free rolls, you’ll need a special gluten-free flour blend designed for baking, and the texture will be different than traditional rolls.
Why do you add instant potato flakes to the dough?
Instant potato flakes help retain moisture and give the rolls a wonderfully soft texture that stays tender for days. They’re a secret ingredient that takes these rolls to the next level of deliciousness.
How long can I let the dough rise?
The dough will rise best within the recommended times—usually 60-90 minutes for the first rise and 45-60 minutes for the second. If left too long, the dough can overproof and lose structure, resulting in dense rolls.
Final Thoughts
There’s nothing quite like the feeling of pulling warm, golden yeast rolls fresh from the oven, especially when you made them yourself with this Easy Yeast Rolls for Beginners Recipe. It’s a wonderful way to add homemade charm to any meal, impress your loved ones, and enjoy the comforting aroma that fills your kitchen. Give this recipe a try—you won’t regret it, and soon these rolls will become one of your all-time favorites.
Print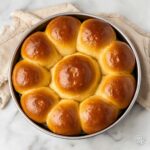
Easy Yeast Rolls for Beginners Recipe
- Prep Time: 15 minutes
- Cook Time: 20 minutes
- Total Time: 3 hours 5 minutes
- Yield: 12 rolls
- Category: Bread
- Method: Baking
- Cuisine: American
Description
These Easy Yeast Rolls are soft, fluffy, and perfect for beginners looking to master homemade bread. With simple ingredients and straightforward steps, these rolls offer a deliciously buttery flavor and tender crumb ideal for any meal or occasion.
Ingredients
Dry Ingredients
- 3 cups all-purpose flour
- 2 tablespoons sugar
- 2 teaspoons instant yeast
- 1 teaspoon salt
- ¼ cup dry milk powder
- ½ cup instant potato flakes
Wet Ingredients
- 5 tablespoons melted butter, divided
- 1 cup warm water (105-115°F)
Instructions
- Mix Ingredients and Knead Dough: Combine the flour, sugar, instant yeast, salt, dry milk powder, instant potato flakes, 4 tablespoons of melted butter, and warm water in the bowl of a stand mixer fitted with a dough hook. Stir to combine and knead on low speed for 5 minutes to form a smooth dough.
- First Rise: Shape the dough into a ball and place it in a greased bowl. Cover the bowl and let the dough rise until it doubles in size, about 60-90 minutes depending on your room temperature. Alternatively, preheat your oven to 100-150°F, turn it off, and place the dough inside to speed up the rising process.
- Shape Rolls: Once the dough has doubled in size, turn it out onto a lightly floured surface. Divide the dough into 12 equal pieces. Gently roll each piece into a ball and place them into a greased 9-inch cake pan. Cover and let the rolls rise again until doubled in size, approximately 45-60 minutes.
- Preheat Oven: About 20 minutes before baking, preheat your oven to 350°F (175°C) to ensure it reaches the right temperature.
- Bake Rolls: Place the uncovered pan with the risen rolls in the preheated oven. Bake for 18-20 minutes or until the rolls are golden brown on top.
- Brush with Butter and Serve: Immediately after baking, brush the warm rolls with the remaining 1 tablespoon melted butter. Allow the butter to absorb for about 5 minutes before serving for a soft, buttery finish.
Notes
- Using warm water between 105-115°F ensures optimal yeast activation.
- You can speed up the rising process by using a warm oven as a proofing box.
- Make sure not to over-bake the rolls to keep them soft and fluffy.
- Instant potato flakes add moisture and tenderness to the rolls.
- These rolls freeze well; thaw and warm before serving.


