
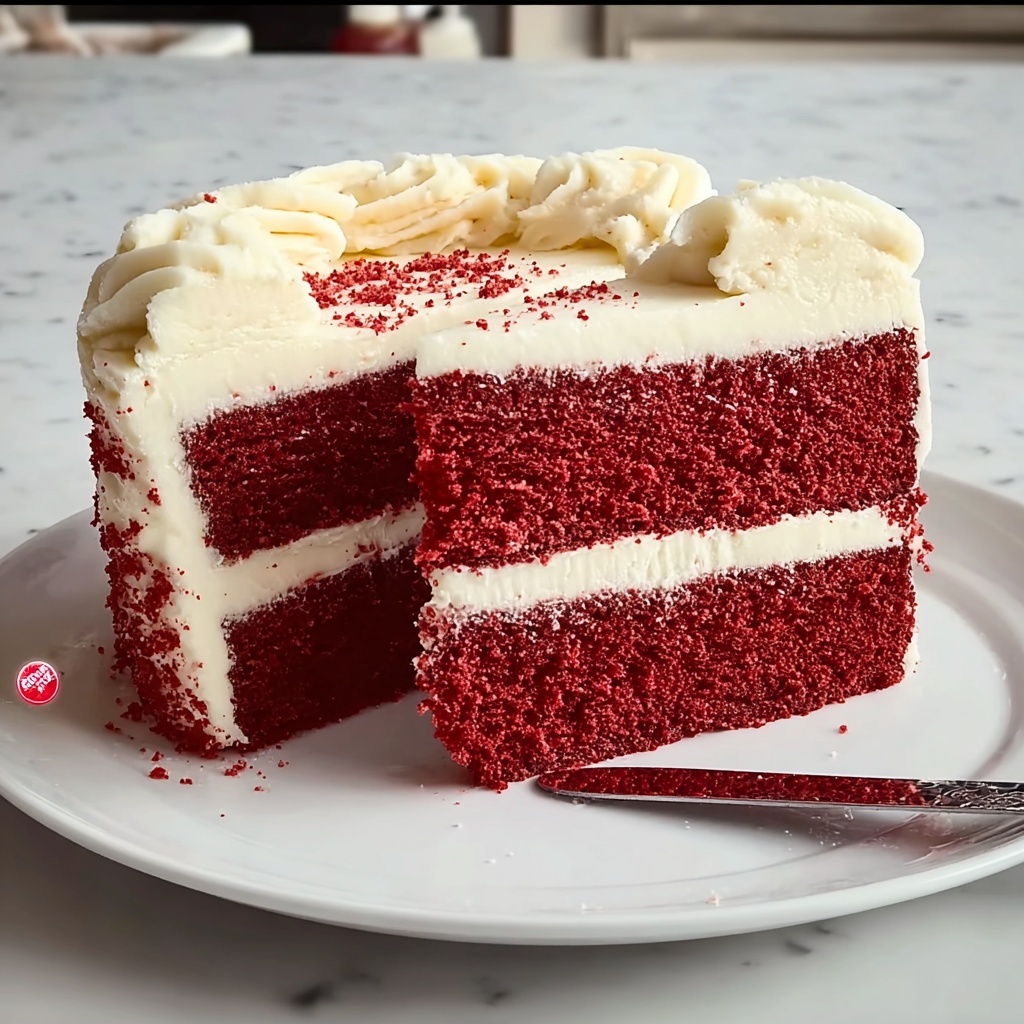
If you’re searching for a dessert that’s as stunning to look at as it is decadent to eat, this Homemade Red Velvet Cake Recipe is the answer. With its vibrant red hue, tender crumb, and luscious cream cheese frosting, this cake brings together classic Southern charm and a rich, velvety texture that will captivate your taste buds and impress anyone lucky enough to share a slice. It’s a true celebration cake that feels special yet approachable, perfect for birthdays, holidays, or anytime you want to treat yourself and your loved ones to something unforgettable.
Ingredients You’ll Need
The magic of this Homemade Red Velvet Cake Recipe comes alive with a handful of simple, carefully chosen ingredients. Each one plays a crucial role — from the flour providing structure, to the cocoa powder adding depth, and the red food coloring bringing that iconic pop of color. Together, they create a cake that’s moist, tender, and visually irresistible.
- 3 cups (360g) cake flour: Use cake flour for a soft, delicate crumb that melts in your mouth.
- 1 tsp baking soda: Helps the cake rise perfectly, giving it a light and airy texture.
- 2 tbsp (10g) unsweetened natural cocoa powder: Adds subtle chocolate flavor essential for red velvet’s depth.
- ½ tsp salt: Balances flavors and enhances sweetness.
- ½ cup (113g) unsalted butter, softened: Contributes richness and moisture to the batter.
- 2 cups (400g) granulated sugar: Sweetens the cake without overpowering other flavors.
- 1 cup (240ml) canola or vegetable oil: Keeps the cake tender and helps retain moisture longer.
- 4 large eggs, room temperature (separated): Eggs build structure; separating whites and yolks creates a lighter texture.
- 1 tbsp pure vanilla extract: Enhances overall flavor with a warm, sweet aroma.
- 1 tsp distilled white vinegar: Reacts with baking soda for leavening and brightens the cocoa’s taste.
- 1–2 tsp red gel food coloring: Gives red velvet its signature dazzling color — the gel offers vibrant results without extra liquid.
- 1 cup (240ml) buttermilk, room temperature: Adds tanginess and tenderizes the crumb, making it irresistibly soft.
How to Make Homemade Red Velvet Cake Recipe
Step 1: Preheat and Prepare Pans
Start by heating your oven to 350°F (177°C). Grease two 9-inch round cake pans and line the bottoms with parchment paper. This prep ensures your cake layers will bake evenly and release easily, so your final presentation looks flawless.
Step 2: Whisk Dry Ingredients
In a large bowl, combine the cake flour, baking soda, cocoa powder, and salt. Whisking these together breaks up any lumps and evenly distributes the cocoa and leavening agents, setting a solid foundation for the batter.
Step 3: Cream Butter and Sugar
Using an electric mixer, beat the softened butter with the granulated sugar until the mixture is light and fluffy. This step incorporates air, which helps keep the cake tender and airy.
Step 4: Add Wet Ingredients and Color
Mix in the oil, egg yolks, vanilla extract, vinegar, and red gel food coloring until everything is fully combined. This vibrant mixture creates the signature red and rich flavor of the cake.
Step 5: Alternate Adding Dry Ingredients and Buttermilk
Add the dry flour mix to your wet mixture in two to three parts, alternating with the buttermilk. This technique prevents overmixing and keeps the cake light and moist.
Step 6: Whip and Fold in Egg Whites
In a separate bowl, whisk the egg whites until soft peaks form. Gently fold these into the batter to introduce volume and give your cake that beautiful fluffy texture without deflating the mixture.
Step 7: Bake the Cake Layers
Divide the batter evenly between your prepared pans and pop them into the oven. Bake for 30 to 32 minutes, checking doneness with a toothpick — it should come out clean or with just a few moist crumbs.
Step 8: Cool Completely
Once baked, let the cakes cool fully in their pans for about 10 minutes before transferring them to wire racks. It’s crucial to let them cool completely before frosting so the cream cheese frosting doesn’t melt.
Step 9: Prepare Cream Cheese Frosting
Beat softened cream cheese and butter until smooth, then gradually add confectioners’ sugar, vanilla extract, and a pinch of salt. Whip until fluffy and creamy — this frosting is the perfect balance of tangy and sweet.
Step 10: Assemble and Chill
Layer and frost the cooled cake with your cream cheese frosting, smoothing the sides for a clean finish. Chill the cake before slicing; it helps everything set beautifully and enhances the flavor.
How to Serve Homemade Red Velvet Cake Recipe

Garnishes
Adding finishing touches can elevate your Homemade Red Velvet Cake Recipe to showstopper status. Consider a sprinkle of finely chopped pecans, a light dusting of cocoa powder, or even some fresh raspberries for contrast. These little details add texture and tartness that complement the rich cake perfectly.
Side Dishes
This red velvet cake pairs wonderfully with a glass of cold milk or a hot cup of coffee or tea. For a gourmet twist, try serving with a scoop of vanilla bean ice cream or fresh whipped cream. The creamy sides balance the cake’s dense richness beautifully.
Creative Ways to Present
Want to impress guests? Turn this Homemade Red Velvet Cake Recipe into mini layer cakes or cupcakes topped with piped cream cheese swirls and edible gold leaf. You can also serve individual slices with drizzles of raspberry coulis or a dusting of powdered sugar for an elegant touch.
Make Ahead and Storage
Storing Leftovers
Wrap leftover cake tightly in plastic wrap and store it in the refrigerator. Properly covered, the cake stays moist and fresh for up to 4 days, making it a convenient treat to enjoy over several lunches or dessert moments.
Freezing
You can freeze this cake either frosted or unfrosted. Wrap each layer well in plastic wrap and then in foil to prevent freezer burn. Thaw layers overnight in the refrigerator before frosting and assembling, or freeze the whole assembled cake for up to 2 months.
Reheating
Because it’s a moist cake, you generally don’t need to reheat slices. However, if preferred, warm it gently in the microwave for 10-15 seconds to soften the frosting slightly and bring out the flavors — just be careful not to overheat.
FAQs
What makes red velvet cake different from chocolate cake?
Red velvet cake is milder in cocoa flavor than traditional chocolate cake and features a distinct tanginess from buttermilk and vinegar. Its signature red color and velvety texture come from the balance of these ingredients combined with cream cheese frosting.
Can I use regular food coloring instead of gel?
While you can, gel food coloring is preferred because it delivers more vibrant color without adding extra liquid that could affect the cake’s texture. If using liquid food coloring, start with less and add gradually to avoid altering batter consistency.
Why do I need to separate the eggs for this recipe?
Separating eggs and whipping the whites adds air and lightness to the batter. Folding in the whipped whites at the end gives the cake a fluffy, tender crumb that’s characteristic of a good red velvet cake.
Can I make this recipe dairy-free?
Yes, you can substitute buttermilk with a dairy-free milk mixed with vinegar or lemon juice. For the frosting, use dairy-free cream cheese and butter alternatives. Keep in mind texture and flavor might vary slightly.
How long does this Homemade Red Velvet Cake Recipe take to prepare?
From start to finish, including baking and cooling, this recipe takes around 55 minutes. It’s perfectly doable on a weekend afternoon to create a showstopping cake without spending all day in the kitchen.
Final Thoughts
This Homemade Red Velvet Cake Recipe is truly one of my favorite indulgences to bake and share. It strikes the perfect balance between simplicity and elegance, making every slice a moment to savor. Whether you’re celebrating a special occasion or treating yourself, this cake will always bring smiles and warm hearts. Give it a try—you’re going to love how irresistibly delicious and charming it turns out!
Print
Homemade Red Velvet Cake Recipe
- Prep Time: 15 minutes
- Cook Time: 32 minutes
- Total Time: 55 minutes
- Yield: 12 servings
- Category: Baking
- Method: Baking
- Cuisine: American
- Diet: Vegetarian
Description
This Homemade Red Velvet Cake recipe is a classic dessert featuring moist, tender layers with a vibrant red color and a subtle cocoa flavor. Topped with a rich and creamy homemade cream cheese frosting, this cake is perfect for celebrations or an indulgent treat. The recipe includes detailed steps to achieve light and fluffy cake layers and a smooth, tangy frosting, ensuring a perfect bake every time.
Ingredients
Cake Ingredients
- 3 cups (360g) cake flour
- 1 tsp baking soda
- 2 tbsp (10g) unsweetened natural cocoa powder
- ½ tsp salt
- ½ cup (113g) unsalted butter, softened
- 2 cups (400g) granulated sugar
- 1 cup (240ml) canola or vegetable oil
- 4 large eggs, room temperature (separated)
- 1 tbsp pure vanilla extract
- 1 tsp distilled white vinegar
- 1–2 tsp red gel food coloring
- 1 cup (240ml) buttermilk, room temperature
Cream Cheese Frosting
- 16 oz (452g) full-fat brick cream cheese, softened
- ¾ cup (170g) unsalted butter, softened
- 5 cups (600g) confectioners’ sugar
- 1½ tsp pure vanilla extract
- Pinch of salt, to taste
Instructions
- Preheat and Prepare Pans: Preheat your oven to 350°F (177°C). Grease and line two 9-inch round cake pans with parchment paper to ensure easy removal of the cakes after baking.
- Mix Dry Ingredients: In a large bowl, whisk together the cake flour, baking soda, cocoa powder, and salt until well combined. Set this mixture aside for later use.
- Cream Butter and Sugar: Using a mixer, beat the softened butter and granulated sugar together until the mixture becomes light and fluffy. This is essential for creating a tender cake texture.
- Add Wet Ingredients: To the creamed butter and sugar, add the vegetable oil, egg yolks, vanilla extract, distilled white vinegar, and red gel food coloring. Mix thoroughly until everything is evenly incorporated and the batter has a vibrant red color.
- Combine Wet and Dry Ingredients: Gradually add the dry ingredient mixture to the wet ingredients in 2 to 3 batches, alternating with the buttermilk. This helps maintain moisture and ensures a smooth batter without lumps.
- Whip Egg Whites: In a separate clean bowl, whip the egg whites until soft peaks form. This means when you lift the beaters, the peaks should hold their shape but still be slightly droopy. Gently fold the whipped egg whites into the cake batter to lighten the mixture and create a fluffy texture.
- Divide Batter and Bake: Evenly distribute the batter between the prepared cake pans. Place them in the preheated oven and bake for 30–32 minutes. To check doneness, insert a toothpick into the center of the cakes; it should come out clean or with a few moist crumbs attached.
- Cool Cakes: Remove the cakes from the oven and allow them to cool completely in their pans on a wire rack. This prevents the frosting from melting when applied.
- Prepare Cream Cheese Frosting: In a mixing bowl, beat the softened cream cheese and butter together until smooth and creamy. Gradually add the confectioners’ sugar, vanilla extract, and a pinch of salt. Continue beating until the frosting is fluffy and spreadable.
- Frost and Assemble Cake: Once the cakes are fully cooled, frost and layer them using the cream cheese frosting, smoothing the sides with a spatula for a neat finish. For best results, chill the cake before slicing to allow the frosting to set and flavors to meld.
Notes
- Ensure eggs are at room temperature to help the batter mix evenly and rise properly.
- Do not overmix the batter after adding dry ingredients to keep the cake tender.
- Folding in egg whites gently is crucial to maintain a light cake texture.
- For a more intense red color, adjust the amount of red gel food coloring between 1 to 2 teaspoons.
- Use full-fat cream cheese for best frosting texture and taste.
- Chilling the cake before serving enhances the flavor and makes slicing easier.
- Store leftover cake covered in the refrigerator for up to 4 days.


