If you’ve ever dreamed of baking bread at home without the fuss of complicated kneading, then you are going to love this No Knead Maple-Infused Bread Recipe. It’s that magical blend of simplicity and flavor where wholesome ingredients and a slow, loving rise come together to create a loaf with an irresistibly crunchy crust and an airy, tender crumb infused gently with just the right touch of natural maple sweetness. This bread feels cozy to make and even cozier to share, whether you’re enjoying it fresh from the oven or pairing it with your favorite spread. Let me take you through every step so you can bring this delightful bread into your kitchen with ease and confidence.
Ingredients You’ll Need
The beauty of this No Knead Maple-Infused Bread Recipe lies in its simplicity — just a handful of pantry staples that combine to create something genuinely special. Each ingredient plays a crucial role: the yeast wakes things up, the flour forms the bread’s structure, the salt balances flavor, and the maple syrup brings a subtle sweet note that transforms the loaf into a real treat.
- Lukewarm water: About 1 ¼ cups to activate the yeast without killing it — not too hot, not too cold.
- Active dry yeast: 1 ½ teaspoons to give your bread that classic rise and airy texture.
- Maple syrup (or honey or sugar): 1 teaspoon adds a gentle natural sweetness that infuses the bread beautifully.
- All-purpose flour: 3 cups provide the perfect foundation for a chewy yet tender crumb.
- Salt: 1 teaspoon to enhance all the flavors and help develop the crust.
How to Make No Knead Maple-Infused Bread Recipe
Step 1: Make the Dough
Start by whisking together the lukewarm water, yeast, and maple syrup in a measuring jug. This simple mixture awakens the yeast, which should bubble up after a few minutes, signaling it’s ready to work its magic. Meanwhile, stir the flour and salt in a large bowl. Pour the bubbly yeast mixture into your dry ingredients and combine the two with a spoon until the dough just comes together — it will be rough and scraggly, but that’s exactly how you want it. No kneading here, just straightforward goodness.
Step 2: Let It Rest and Rise
Cover the bowl with a clean dish towel and let the dough rest quietly at room temperature for about 2 hours. This waiting stage allows the dough to grow big and puffy, filling with air and flavor. It’s a slow transformation that gives you time to prep other parts of your day and anticipate the fresh bread waiting at the finish line.
Step 3: Preheat and Prepare the Dutch Oven
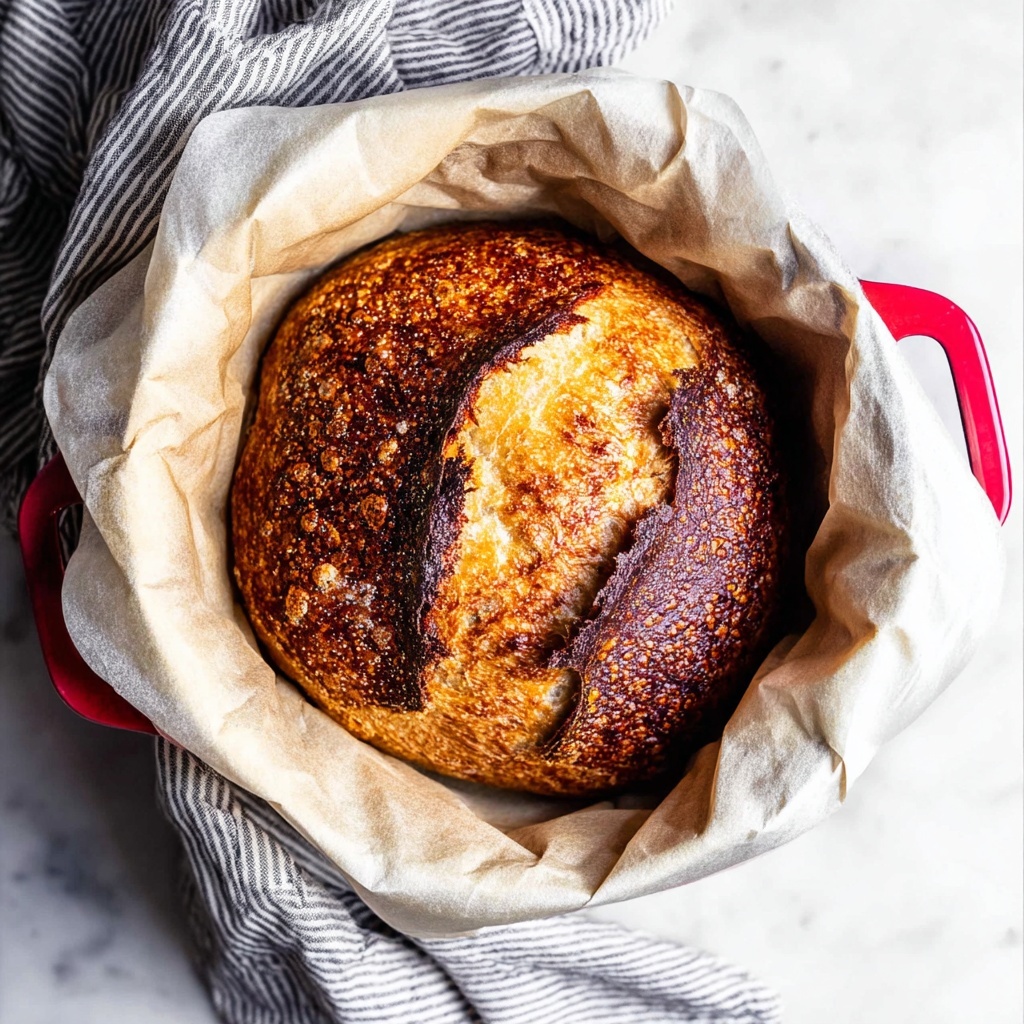
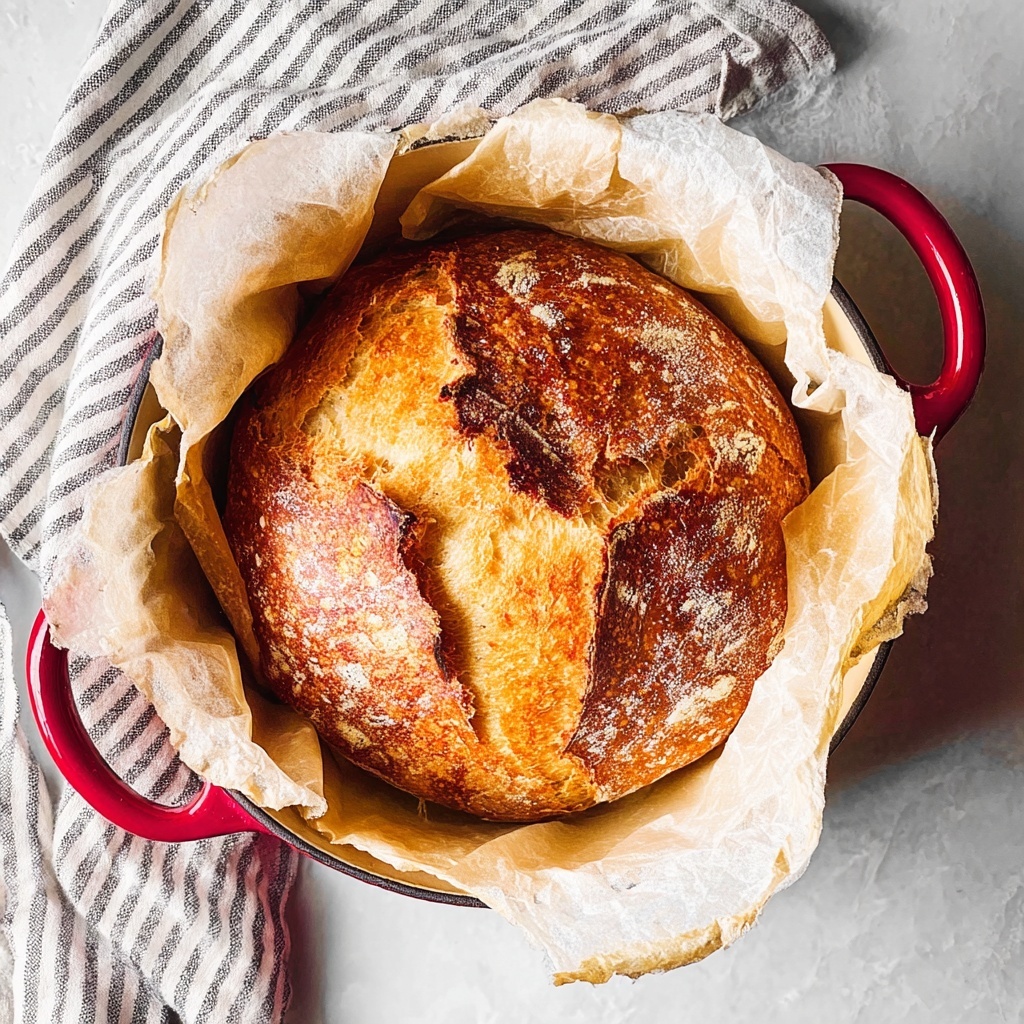
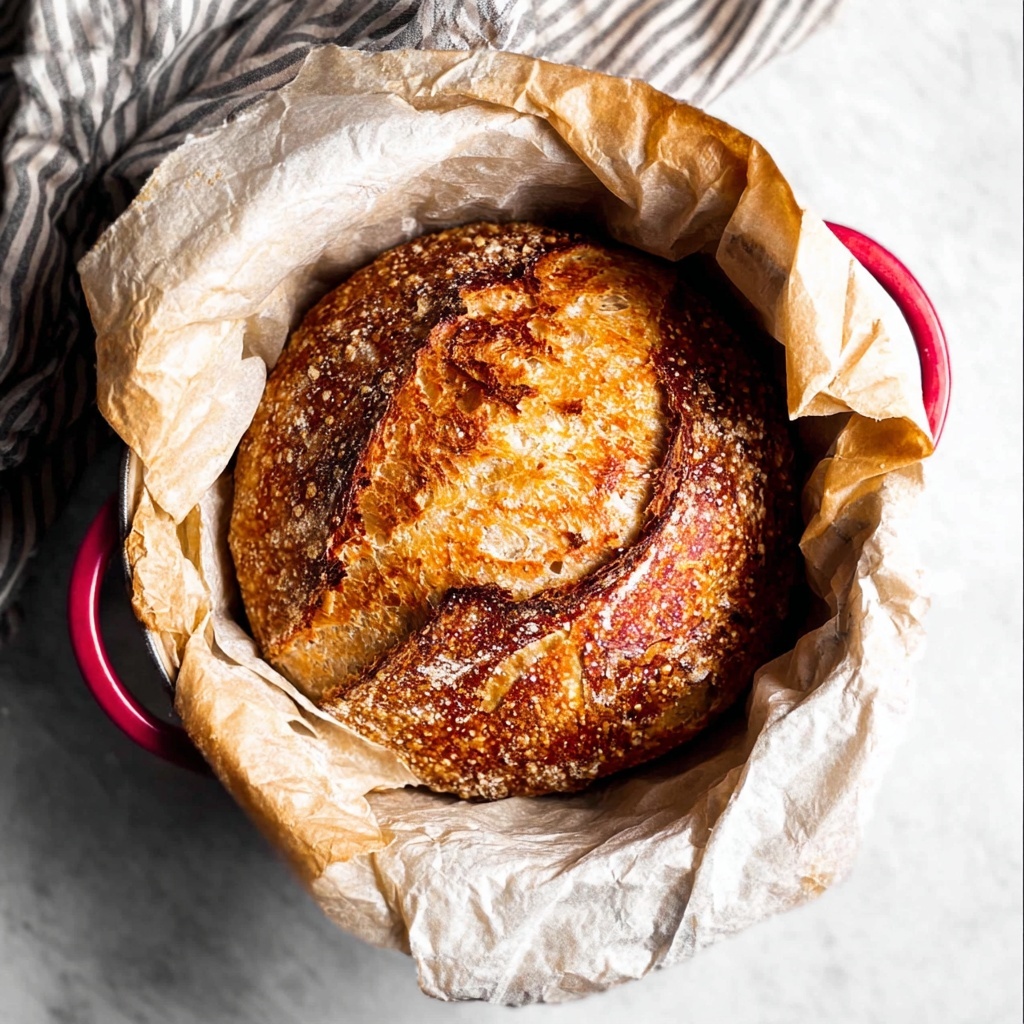
When your dough reaches that glorious puffed-up stage, it’s time to get the oven going. Preheat to 445°F (230°C) and place your 8-9 inch (20-22 cm) round Dutch oven with its lid inside to heat up along with the oven. This step is essential because the blazing hot pot mimics a professional bread oven, helping create that amazing crust. Once preheated, carefully remove the Dutch oven to a heatproof surface and line it with baking parchment — don’t worry if the paper hangs over the edges, that’ll help with lifting the bread out later.
Step 4: Bake to Golden Perfection
Gently scrape your dough into the lined Dutch oven, keeping it all in one piece as best you can. Cover it with the lid — no rushing here, the steam sealed inside will give you that airy crumb and crackly crust. After 25 minutes, carefully remove the lid to let the crust brown and crisp for another 10 minutes or so until you see that gorgeous golden color and hear that satisfying crunch when tapped. Transfer the bread to a cooling rack and take a moment to admire your achievement.
How to Serve No Knead Maple-Infused Bread Recipe
Garnishes
Serving this bread can be as simple or as creative as you like. Consider brushing the top with a little melted butter right when it comes out of the oven for an extra shine and richness. A sprinkle of flaky sea salt or even some crushed nuts can add texture and a hint of savory contrast that’s wonderful alongside the subtle maple flavor.
Side Dishes
This loaf pairs beautifully with just about anything! Think creamy cheeses like brie or goat cheese, or a hearty soup on a chilly day. A drizzle of olive oil with fresh herbs or a scattering of roasted garlic makes an elegant yet easy accompaniment. The natural sweetness of the maple notes works surprisingly well with sharp or spicy flavors too.
Creative Ways to Present
Imagine slicing thick slabs to make rustic toast topped with smashed avocado and chili flakes or turning this bread into a decadent bread pudding with a maple twist. You can also hollow out a loaf to create a bread bowl for stews, impressing guests with your creativity while nurturing your homey vibes. The natural sweetness offers a gourmet touch for every presentation.
Make Ahead and Storage
Storing Leftovers
If you’re lucky enough to have any leftovers, wrap the bread tightly in a clean kitchen towel or store it in a paper bag to maintain its crusty exterior while keeping the inside soft. Avoid plastic bags as they trap moisture and can make the crust soggy. Stored this way, your bread should stay delightful for about 2 days.
Freezing
This bread freezes wonderfully if you want to stretch out the joy. Slice it first for easy grab-and-go portions, then wrap tightly with plastic wrap and foil or place in a freezer bag. It will keep well for up to 3 months, letting you thaw fresh bread any time you crave that no-nonsense homemade loaf.
Reheating
To bring that crisp crust back to life, reheat the bread in a 350°F (175°C) oven for 10 to 15 minutes before serving. If your bread is frozen, let it thaw at room temperature first, then pop it in the oven. This little extra step really revives the fresh-baked experience perfectly.
FAQs
Can I substitute maple syrup with honey or sugar?
Absolutely! While maple syrup adds a lovely natural sweetness and a subtle flavor, honey or sugar will also work just fine. Each sweetener slightly changes the taste, so feel free to experiment with what you have on hand.
Do I really not need to knead the dough?
Yes, the “no knead” method relies on a long rise to develop gluten naturally, so there’s no need to knead. It’s a superb way to save effort and still get a fantastic loaf.
How long can I let the dough rise?
While about 2 hours at room temperature works well, you can also let the dough rise longer for a deeper flavor, even overnight in the fridge. Just bring it back to room temp before baking.
What’s the best flour to use?
All-purpose flour is perfect for this recipe, but if you want a chewier texture or nuttier flavor, you can substitute part of it with bread flour or whole wheat flour, keeping in mind it might slightly alter the rise and texture.
Can I bake this bread without a Dutch oven?
Though the Dutch oven is key for achieving that crusty, artisan-style loaf, you can use a heavy oven-safe pot with a lid or bake the dough on a preheated baking stone covered loosely with a large, inverted roasting pan. Results may vary, but it’s worth trying if you don’t have a Dutch oven.
Final Thoughts
There’s truly something special about the No Knead Maple-Infused Bread Recipe — it’s approachable for bakers of all levels and fills your kitchen with an inviting aroma that’s impossible to resist. Giving this recipe a try means welcoming simple luxury into your daily bread, no fancy techniques required. So, grab your ingredients, embrace the easy steps, and get ready to enjoy a loaf that’s as comforting as it is delicious. Your future self and your taste buds will thank you.
Print
No Knead Maple-Infused Bread Recipe
- Prep Time: 10 minutes
- Cook Time: 35 minutes
- Total Time: 2 hours 45 minutes
- Yield: 10 slices
- Category: Bread
- Method: Baking
- Cuisine: American
- Diet: Vegetarian
Description
This No Knead Bread recipe offers an easy and foolproof way to enjoy homemade bread with minimal effort. By simply mixing a few basic ingredients and letting the dough rise naturally, you can bake a rustic, crusty loaf in a Dutch oven that rivals artisanal bakery bread. Perfect for beginners and bread lovers alike, this method requires no kneading, making it both convenient and rewarding.
Ingredients
Wet Ingredients
- 1 ¼ cups lukewarm water (not too hot or it will kill the yeast)
- 1 ½ teaspoons active dry yeast
- 1 teaspoon maple syrup (or honey or sugar)
Dry Ingredients
- 3 cups all-purpose flour
- 1 teaspoon salt
Instructions
- Make dough: Whisk the lukewarm water, active dry yeast, and maple syrup together in a measuring jug. Set this mixture aside until you see bubbles forming on the surface, indicating the yeast is active. Meanwhile, stir the all-purpose flour and salt together in a large mixing bowl. Add the yeast mixture to the flour mixture and stir until combined. The dough will look scraggly and shaggy, which is normal for this no-knead bread.
- Rest: Cover the bowl with a clean dishtowel and leave the dough to rise at room temperature for about 2 hours, or until it has become big and puffy. The rising time may vary depending on your environment’s altitude, humidity, and temperature.
- Prep: Once the dough has risen, preheat your oven to 445°F (230°C). Place an 8-9 inch (20-22 cm) round Dutch oven with a heat-safe lid inside the oven as it preheats to get it blazing hot. When ready, carefully remove the hot Dutch oven from the oven to a heat-proof surface. Remove the lid and line the inside with a piece of baking parchment, allowing some overhang.
- Bake: Scrape the risen dough into the lined Dutch oven in one piece. Cover with the lid (place it over the parchment overhang) and bake for 25 minutes. Then carefully remove the lid and continue baking for about 10 more minutes until the bread is golden brown, crusty, and fully baked through. Remove the bread from the Dutch oven and place it on a wire rack to cool before slicing.
Notes
- Be sure the water is lukewarm, not hot, to avoid killing the yeast.
- Allow the dough to rise until very puffy for the best texture.
- Use care when handling the hot Dutch oven to avoid burns.
- Let the bread cool completely before slicing to ensure proper crumb structure.
- Maple syrup, honey, or sugar can be used interchangeably as the yeast’s food source.
- Using a Dutch oven traps steam and helps develop a crisp crust.


