
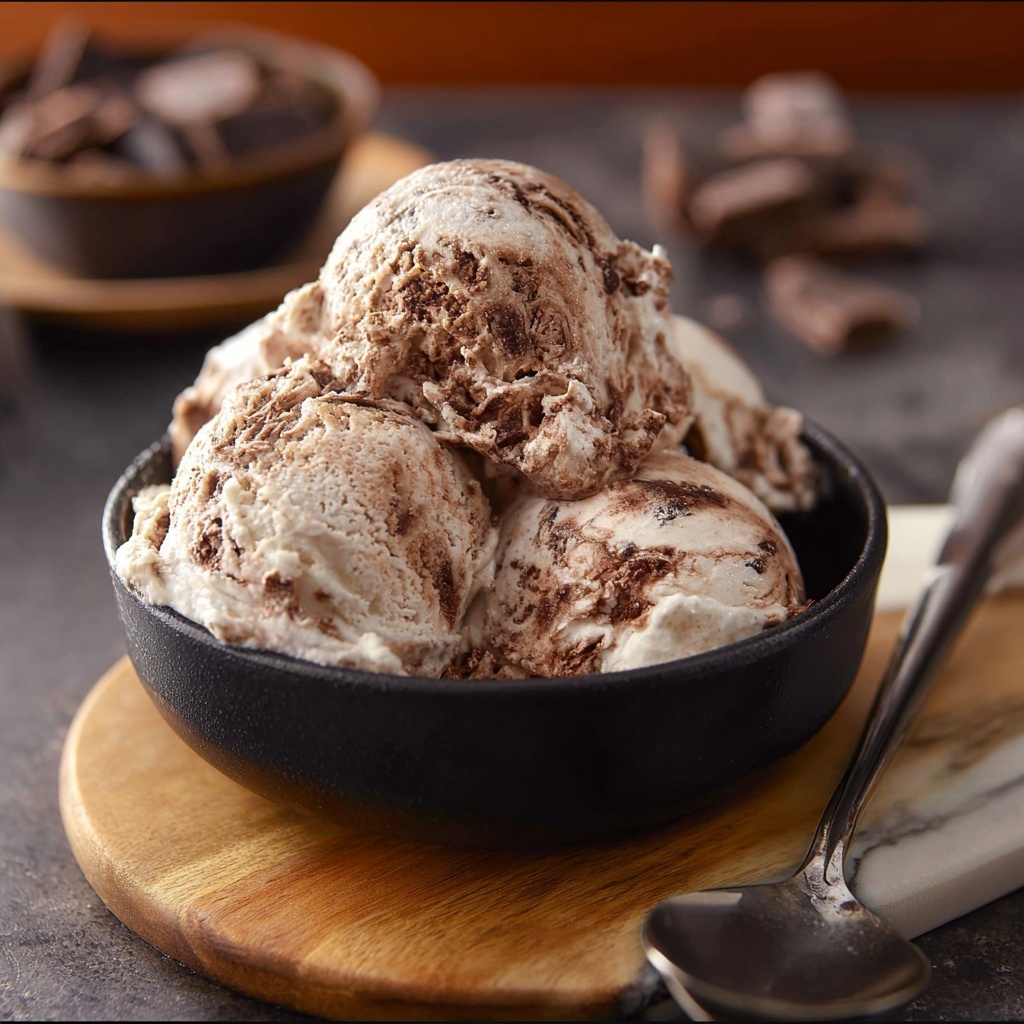
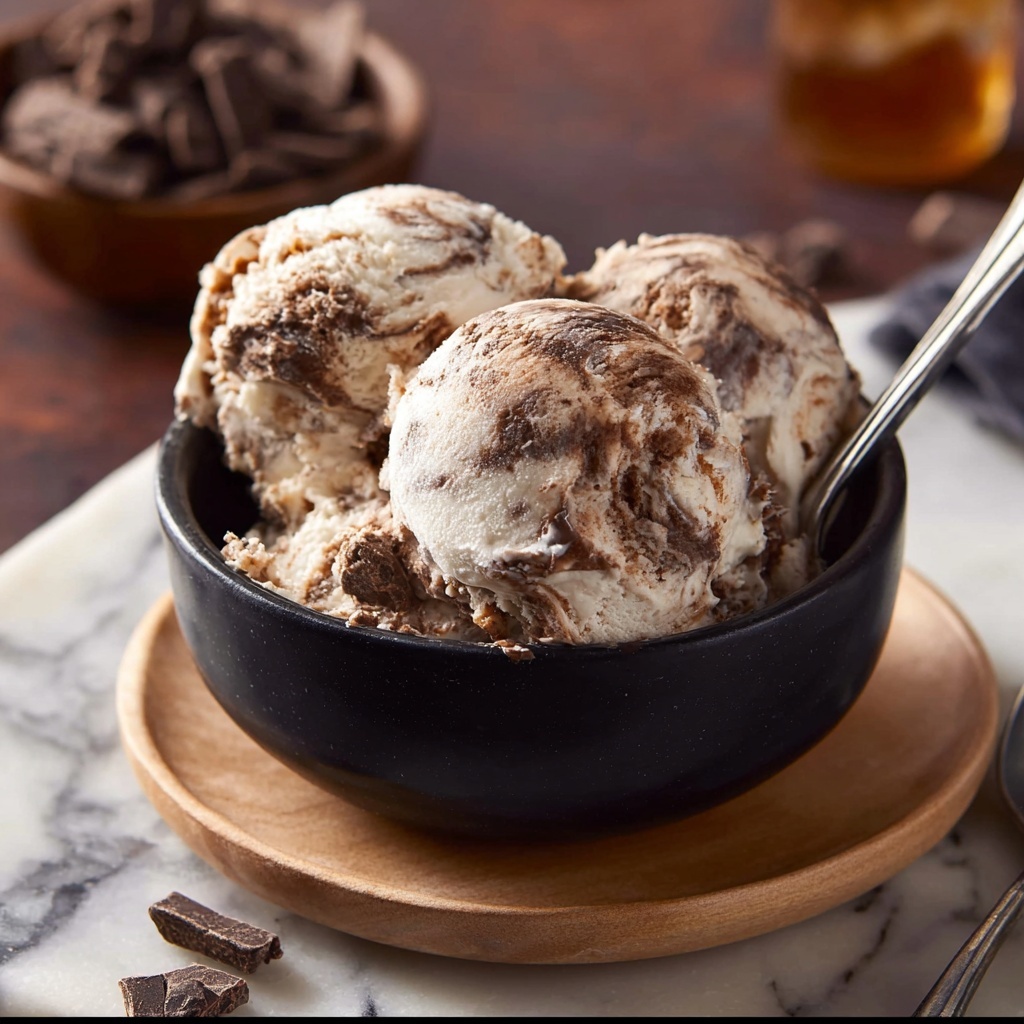
If you adore the rich, creamy layers and the luscious coffee flavors of classic tiramisu but crave something cool and refreshing, this Tiramisu Ice Cream Recipe is going to be your new go-to treat. Imagine the velvety mascarpone, the kick of espresso, and the delicate crunch of ladyfingers all swirling together in a frozen delight that melts in your mouth. It’s the perfect balance of decadence and indulgence, reinvented as a silky ice cream that you can enjoy whenever the mood strikes!
Ingredients You’ll Need
Gathering your ingredients is a breeze because this ice cream relies on simple but essential elements that each bring their own magic. From the creamy mascarpone adding that signature smoothness, to the rich espresso enhancing depth, and the ladyfingers giving texture and nostalgic flavor—every component shines through.
- Sweetened condensed milk (14 oz can): Provides sweetness and smooth creaminess without extra sugar fuss.
- Mascarpone cheese (8 oz): The star ingredient lending a luxurious, velvety texture reminiscent of classic tiramisu.
- Unsweetened cocoa powder (1/2 cup): Adds a deep chocolate bitterness that balances the sweetness perfectly.
- Ground espresso (2 tablespoons): Gives that rich coffee kick essential to tiramisu’s classic flavor profile.
- Heavy whipping cream (2 cups): Whipped to fluffy perfection, it makes the ice cream light and airy.
- Strong brewed coffee (1 cup): Used to soak the ladyfingers for that authentic, soaked texture and flavor.
- Granulated sugar (2 tablespoons): Dissolves into the coffee, adding a bit of sweetness to the soak.
- Ladyfingers cookies (8–10, broken): Provide delightful, coffee-soaked crunch throughout.
- Good quality chocolate bar (4 oz): Optional but fantastic for mixing in or topping, for an extra layer of indulgence.
How to Make Tiramisu Ice Cream Recipe
Step 1: Prepare Your First Mascarpone Mixture
Start by blending half of the sweetened condensed milk with half of the mascarpone cheese, then mix in ¼ cup cocoa powder and one tablespoon of ground espresso. Use a whisk attachment on low speed for this stage to combine everything gently but thoroughly without deflating the mixture.
Step 2: Whip in the Cream
Slowly pour in half of the heavy whipping cream, then crank your mixer to medium speed. Whip until you see a thick, smooth, and fluffy texture forming—this ensures that your ice cream stays light and airy.
Step 3: Set Aside the First Mixture
Once your cream is beautifully whipped in, transfer this mixture into a fresh bowl to keep it separate while you prepare the second mascarpone base.
Step 4: Blend the Second Mascarpone Batch
Clean your mixing bowl and combine the remaining sweetened condensed milk and mascarpone cheese. This will create the second, slightly different flavor layer for the ice cream.
Step 5: Whip the Remaining Cream
Add the remaining heavy whipping cream slowly on low speed, then whip it up on medium speed until it’s also thick and fluffy like the first batch.
Step 6: Sweeten Your Coffee Soak
Mix the brewed coffee with two tablespoons of sugar until fully dissolved. This sweetened coffee bath will give the ladyfingers their signature moistness and flavor.
Step 7: Get Your Container Ready
Choose a container that works well for freezing your ice cream, such as a bread loaf pan. It makes layering simpler and your ice cream easier to slice or scoop later on.
Step 8: Create the First Layer
Start layering dollops of each mascarpone mixture alternately at the bottom of your container, forming a patchwork or quilt-like pattern which will create marbled flavor in every bite.
Step 9: Add Coffee-Soaked Ladyfingers
Dip several broken ladyfinger pieces in the coffee mixture quickly so they absorb flavor but don’t become too soggy, then sprinkle them evenly over the ice cream layer. This addition brings that classic tiramisu texture.
Step 10: Build Up Remaining Layers
Repeat the alternating dollops and ladyfinger scattering for two more layers until all your mixtures and cookies are used, building a delicious, layered masterpiece.
Step 11: Smooth and Dust
Use a spatula or the back of a spoon to smooth the surface, then garnish the top with a generous dusting of cocoa powder to keep that traditional tiramisu look and touch of bitterness.
Step 12: Freeze to Set
Cover your container tightly and freeze for at least six hours so all the luscious layers set into a satisfyingly scoopable ice cream.
How to Serve Tiramisu Ice Cream Recipe
Garnishes
To elevate your serving presentation, sprinkle shaved dark chocolate or a light dusting of espresso powder on top right before serving. Fresh mint leaves or a few whole coffee beans can add a charming and aromatic touch that will impress your guests and elevate your own enjoyment.
Side Dishes
This ice cream is a luscious dessert all on its own, but it pairs beautifully with a simple biscotti or a fresh berry compote. The crunchy biscotti enhance the coffee vibe, while tart berries add bright contrast to the indulgent creaminess.
Creative Ways to Present
Serve scoops in elegant glass dishes layered with espresso-soaked ladyfingers or cascade some warm chocolate sauce over the top for a dramatic melting effect. You can also create mini parfaits by layering the ice cream with crushed ladyfingers and extra mascarpone whipped cream in small jars for a delightful party treat.
Make Ahead and Storage
Storing Leftovers
Store any leftover tiramisu ice cream in an airtight container with a tight-fitting lid to protect it from absorbing odors or becoming icy. Keeping it in a consistent part of the freezer will maintain its creamy texture best.
Freezing
This ice cream freezes well for up to two weeks. Make sure it is covered tightly with plastic wrap directly on the surface before putting the lid on, to prevent ice crystals. When frozen solid, it’s ready to delight you anytime you crave that tiramisu charm in a frozen form.
Reheating
Because it’s ice cream, it’s best enjoyed chilled or frozen—no reheating needed! Just let it sit on the counter for a few minutes if it’s too firm to scoop, and then dive into that perfectly creamy texture.
FAQs
Can I make this recipe without an ice cream machine?
Absolutely! This Tiramisu Ice Cream Recipe is designed to be simple and doesn’t require an ice cream machine, thanks to the whipped cream creating a light texture naturally.
Can I substitute the mascarpone cheese?
Mascarpone is key for authentic flavor and creaminess, but if needed, cream cheese mixed with a bit of heavy cream can be a workable alternative, though it won’t be quite the same.
How long should I soak the ladyfingers in coffee?
Dip them quickly—just a second or two—so they absorb coffee without becoming too soggy. The goal is to keep a slight chewiness and avoid a mushy texture.
Can I prepare this recipe in advance for a party?
Definitely! The Tiramisu Ice Cream Recipe can be assembled a day or two ahead and frozen, making it an excellent make-ahead dessert for entertaining.
Is this recipe kid-friendly?
It contains coffee and espresso, so it’s best suited for adults or older children who enjoy subtle coffee flavors. You can omit espresso and coffee soak to make a mild, kid-friendly version.
Final Thoughts
There’s something truly special about this Tiramisu Ice Cream Recipe that elevates homemade desserts to a new level of indulgence. It combines the best of classic tiramisu with the irresistible coolness of ice cream—a perfect treat for warm days or any time you want to impress with ease. Give it a try and watch it quickly become a beloved favorite in your recipe collection!
Print
Tiramisu Ice Cream Recipe
- Prep Time: 10 minutes
- Cook Time: 0 minutes
- Total Time: 6 hours 10 minutes
- Yield: 8 servings
- Category: Dessert
- Method: No-Cook
- Cuisine: Italian
Description
This Tiramisu Ice Cream recipe combines the classic flavors of the iconic Italian dessert with the creamy texture of rich homemade ice cream. Layered with mascarpone, espresso, cocoa, coffee-soaked ladyfingers, and chunks of quality chocolate, this no-churn ice cream dessert is a delightful treat perfect for coffee and dessert lovers. It requires no baking and uses simple whipping techniques to achieve a smooth, fluffy texture that sets beautifully in the freezer.
Ingredients
Ice Cream Base One
- 7 ounces sweetened condensed milk (half of 14 oz can)
- 4 ounces mascarpone cheese (half of 8 oz)
- 1/4 cup unsweetened cocoa powder
- 1 tablespoon ground espresso
Ice Cream Base Two
- 7 ounces sweetened condensed milk (remaining half)
- 4 ounces mascarpone cheese (remaining half)
- 2 cups heavy whipping cream (divided)
Coffee Mixture
- 1 cup strong brewed coffee
- 2 tablespoons granulated sugar
Additional Ingredients
- 8–10 ladyfinger cookies, broken into 1 inch pieces
- 1/2 cup unsweetened cocoa powder (for dusting)
- 4 ounces good quality chocolate bar, broken into chunks
Instructions
- Prepare First Ice Cream Base: In a mixing bowl, combine half the sweetened condensed milk, half the mascarpone cheese, 1/4 cup cocoa powder, and 1 tablespoon ground espresso. Mix on low speed with a whisk attachment until combined.
- Whip First Base: Slowly add 1 cup of the heavy whipping cream while mixing on low. Then increase speed to medium and whip until the mixture is thick, smooth, and fluffy.
- Set Aside First Base: Transfer this mixture into a separate bowl and set aside for layering later.
- Prepare Second Ice Cream Base: Using the original mixing bowl (no need to wash), combine the remaining sweetened condensed milk and mascarpone cheese until smooth.
- Whip Second Base: Slowly add the remaining 1 cup heavy whipping cream on low speed, then whip on medium speed until thick, smooth, and fluffy.
- Make Coffee Mixture: In a small bowl, stir together the strong brewed coffee and granulated sugar until the sugar has fully dissolved.
- Prepare Container: Select a container for your ice cream (a bread loaf pan is ideal) to assemble the layers.
- Layer Ice Cream and Cookies: Begin by spooning dollops of the two ice cream mixtures alternately into the bottom of the container to create a quilt-like textured base, filling about one third of the pan.
- Add Ladyfingers: Quickly dip pieces of ladyfinger cookies in the coffee mixture and scatter them evenly over the first ice cream layer.
- Continue Layering: Repeat the alternating dollops of ice cream mixtures and dollops of coffee-dipped ladyfingers for the remaining two layers, making sure to incorporate the chocolate chunks as you go.
- Smooth and Dust: Use a spatula or the back of a spoon to smooth the top layer of the assembled ice cream, then dust generously with unsweetened cocoa powder.
- Freeze: Cover the container tightly and freeze the tiramisu ice cream for at least six hours or until fully set and firm.
Notes
- Ensure ladyfingers are dipped quickly into the coffee mixture to avoid sogginess that may affect the texture.
- Use good quality mascarpone cheese and chocolate for the best flavor.
- This recipe does not require an ice cream maker, making it easy to prepare at home.
- For an extra coffee kick, sprinkle additional ground espresso on layers as you build them.
- Store leftovers covered in the freezer and consume within one week for optimal freshness.


