
If you have a sweet tooth and a love for nostalgic flavors, the Vintage Cherries in the Snow Recipe is an absolute treasure to add to your dessert repertoire. This classic treat combines the fluffy lightness of whipped cream and cream cheese with the bright, comforting burst of cherry pie filling. It’s a showstopper that’s deceptively simple to make but oozes charm and indulgence, perfect for sharing with family or friends on any cozy occasion.
Ingredients You’ll Need
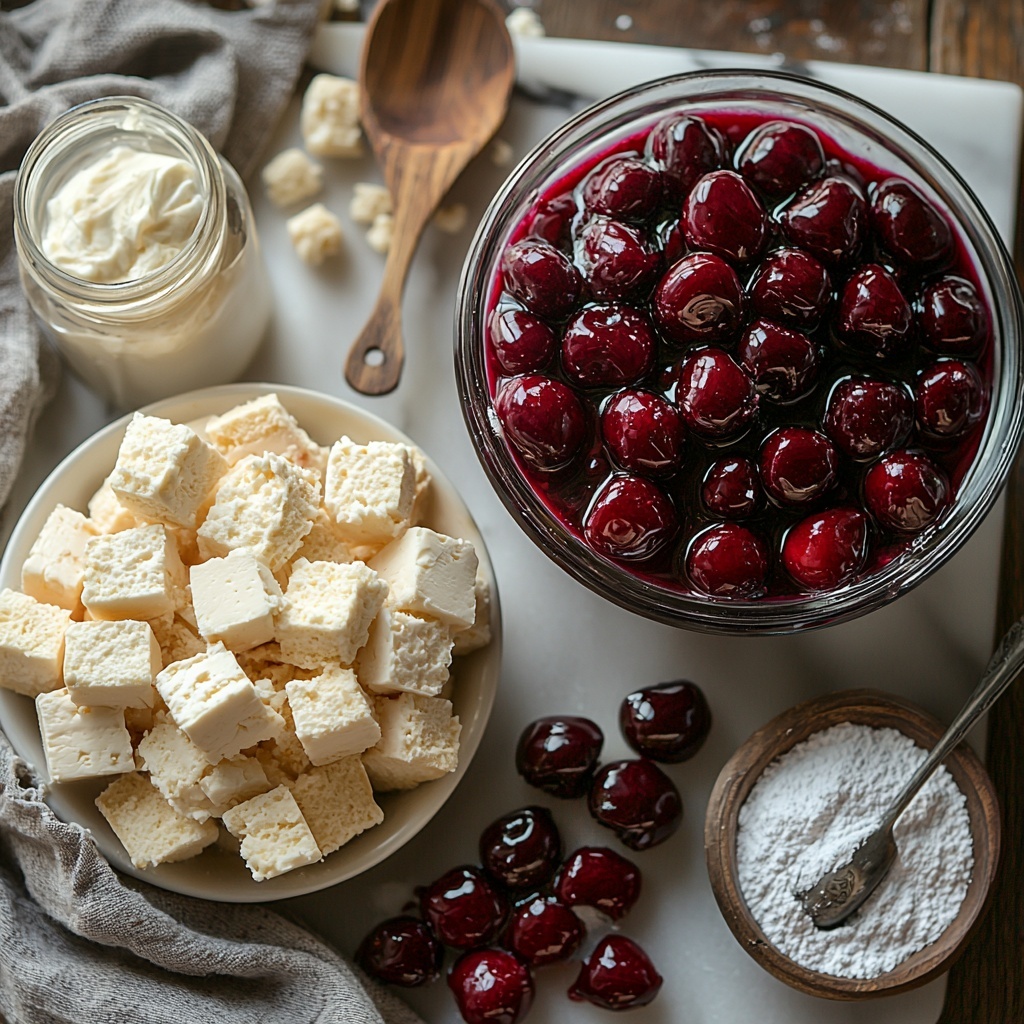
Every ingredient in this recipe plays a vital role in creating the magic of Vintage Cherries in the Snow Recipe. From creamy textures to the perfect balance of sweetness and tang, these ingredients come together to make a dessert that’s both elegant and approachable.
- Heavy whipping cream: Chilled and whipped to stiff peaks, it brings a luscious, airy texture that is the base of this dessert.
- Cream cheese, softened: Adds a tangy richness that perfectly complements the sweetness of cherries.
- Powdered sugar: Ensures a smooth, sweet flavor without graininess, blending beautifully with the cream cheese.
- Vanilla extract: Provides a warm, subtle depth that enhances every bite.
- Angel food cake or pound cake, cubed (optional): Offers a soft, spongey layer that soaks up the cream and cherries for added texture.
- Cherry pie filling: The star ingredient, delivering that classic cherry flavor and vibrant color which makes this dessert instantly recognizable.
How to Make Vintage Cherries in the Snow Recipe
Step 1: Whip the Cream
Begin by pouring the heavy whipping cream into a chilled bowl. Whipping it to stiff peaks is crucial because it provides the airy, fluffy foundation for the dessert. Once whipped, set it aside in the fridge to keep it cool and fresh while you prepare the rest.
Step 2: Prepare the Cream Cheese Mixture
Next, beat the softened cream cheese in a separate bowl until it’s smooth and creamy. Then add powdered sugar and vanilla extract. Mixing these together creates a sweet, smooth, and flavorful base that balances the tartness of the cherries perfectly.
Step 3: Fold in the Whipped Cream
Folding the whipped cream gently into the cream cheese mixture is the key to keeping the texture light and airy. This step requires a soft hand so that you don’t deflate all the beautiful airiness you just created.
Step 4: Layer the Base
If you’re using the optional angel food or pound cake, add a generous layer of the cubed pieces at the bottom of your serving dish or trifle bowl. This layer helps soak up some cream and cherries, adding a delicious dimension to every bite.
Step 5: Spread the Cream Mixture
Evenly spread the whipped cream and cream cheese blend over the cake or directly into the dish if you choose to skip the cake. This creamy layer is what makes this dessert feel indulgent and velvety smooth.
Step 6: Add the Cherry Pie Filling
Spoon the cherry pie filling over the cream layer, making sure to spread it to the edges for a visually stunning presentation. The bright red cherries bring not only fantastic flavor but also that nostalgic “snowy” look this recipe is famous for.
Step 7: Chill Before Serving
Finally, refrigerate the assembled dessert for at least two hours. Chilling allows all the layers to meld together beautifully, enhancing the flavors and giving you that perfect, cool chill that’s so satisfying in each spoonful.
How to Serve Vintage Cherries in the Snow Recipe
Garnishes
For an extra special touch, consider adding some freshly grated white chocolate or a few toasted almond slivers on top before serving. These add a subtle crunch and a bit of elegance to the already impressive presentation.
Side Dishes
This dessert pairs wonderfully with a simple cup of black coffee or a splash of dessert wine. Fresh berries or a light citrus sorbet can also complement the creamy, fruity notes without overwhelming the vintage charm.
Creative Ways to Present
If you want to impress guests, try serving the Vintage Cherries in the Snow Recipe in individual clear glass cups or parfait glasses. This not only looks beautiful but also lets everyone appreciate the lovely layers of cake, cream, and cherries.
Make Ahead and Storage
Storing Leftovers
Keep any leftovers covered tightly in the refrigerator to maintain freshness and prevent the cream from absorbing other smells. Consuming it within 2 days ensures the best texture and flavor.
Freezing
Because of the whipped cream and cream cheese base, freezing is not recommended for this dessert. Thawing would affect the delicate texture and cause separation, which can impact the delicious lightness of the Vintage Cherries in the Snow Recipe.
Reheating
This dessert is best enjoyed cold and straight from the fridge. Reheating would melt the whipped cream and change its signature texture, so resist the urge and relish it chilled instead.
FAQs
Can I use fresh cherries instead of cherry pie filling?
Fresh cherries are lovely but won’t have the same syrupy sweetness and consistency as cherry pie filling. You could make a fresh cherry compote, but it will result in a slightly different texture and flavor profile.
Is there a dairy-free way to make Vintage Cherries in the Snow Recipe?
Substituting with coconut cream and dairy-free cream cheese alternatives can work, but whipping coconut cream to stiff peaks can be tricky. The result will be delicious but different from the traditional recipe.
Can this dessert be made gluten-free?
Absolutely! Simply omit the cake layer or replace it with a gluten-free angel food cake or crushed gluten-free cookies to keep the flavor and texture consistent.
How long does the dessert need to chill?
At least 2 hours in the refrigerator allows the flavors to meld and the dessert to set properly. For best results, prepare it the day before serving.
Can I make this recipe ahead for a party?
Yes! This is a fantastic make-ahead dessert. Prepare it up to 24 hours in advance and keep it refrigerated until serving time. It’s an effortless way to impress guests without last-minute stress.
Final Thoughts
This Vintage Cherries in the Snow Recipe is more than just a dessert; it’s a delightful little trip back to simpler times with flavors that never go out of style. It’s easy to make, incredibly delicious, and perfect for creating warm memories around the table. I can’t wait for you to try it and experience the magic of these snowy, cherry-topped layers for yourself!
Print
Vintage Cherries in the Snow Recipe
- Prep Time: 15 minutes
- Cook Time: 0 minutes
- Total Time: 2 hours 15 minutes
- Yield: 8 servings
- Category: Dessert
- Method: No-Cook
- Cuisine: American
- Diet: Vegetarian
Description
Vintage Cherries in the Snow is a classic, light, and airy layered dessert featuring whipped cream, cream cheese, and sweet cherry pie filling atop angel food or pound cake. Perfectly chilled, this no-bake treat offers a refreshing and nostalgic flavor that serves well for gatherings or a simple sweet indulgence.
Ingredients
Whipped Cream Mixture
- 1 cup heavy whipping cream
- 8 oz cream cheese, softened
- 1/2 cup powdered sugar
- 1 teaspoon vanilla extract
Additional Ingredients
- 3 cups angel food cake or pound cake, cubed (optional)
- 1 (21 oz) can cherry pie filling
Instructions
- Whip the Cream: Pour the heavy whipping cream into a chilled mixing bowl. Using an electric mixer, whip on high speed until stiff peaks form. Place the whipped cream in the refrigerator to chill until ready to use.
- Prepare Cream Cheese Mixture: In a separate bowl, beat the softened cream cheese until it is smooth and creamy. Add the powdered sugar and vanilla extract, mixing thoroughly until the mixture is fluffy and well combined.
- Fold Whipped Cream: Gently fold the chilled whipped cream into the cream cheese mixture. This should be done carefully to maintain the light and airy texture of the whipped cream.
- Layer the Base: In a glass dish or trifle bowl, add a layer of the cubed angel food cake or pound cake. This layer is optional but adds texture and substance to the dessert.
- Add Cream Mixture: Evenly spread the whipped cream and cream cheese mixture over the cake layer to create a smooth and uniform layer.
- Top with Cherries: Spoon the cherry pie filling evenly over the whipped cream layer, spreading it gently to the edges for full coverage.
- Chill Before Serving: Place the assembled dessert in the refrigerator for at least 2 hours to allow the flavors to meld and the dessert to set properly. Serve chilled and enjoy.
Notes
- The choice of cake is flexible; angel food cake provides a lighter texture, while pound cake offers a denser base.
- For a gluten-free version, use gluten-free cake or substitute with crushed gluten-free cookies or graham crackers.
- Ensure heavy cream and mixing bowls are well chilled for optimal whipping results.
- Chilling the dessert improves flavor blending and firming of layers.
- This dessert is best served cold and consumed within 2 days for freshness.


